Installation
VoxDMR runs on Android, Linux, and Windows. Pick your platform below.
Requirements
- DMR ID: get one at radioid.net if you don’t have one. Free, requires a valid amateur radio licence.
- Android version (Android only): Android 7.0 (Nougat) or newer — API level 24+.
- A network password:
- For BrandMeister: your hotspot security password from BrandMeister SelfCare, under Hotspot security password. This is not your BrandMeister account password — it’s a separate string you set yourself in SelfCare.
- For FreeDMR: the documented public password (
passw0rdon the canonical UK hotspot). - For TGIF / ADN / other Homebrew networks: whatever the operator publishes. Many MMDVM-based networks accept any password since they identify by DMR ID.
VoxDMR Android is published on Google Play.
- Open the VoxDMR Play Store listing.
- Tap Install.
- Launch the app.
The first launch opens the setup wizard — vocoder firmware, your callsign and DMR ID, a network, talkgroups, and a mic check, in that order.
One thing the wizard doesn’t cover:
- Battery optimization: on some devices (Xiaomi, Samsung, OnePlus, Huawei) Android may aggressively kill the app in the background. Open Settings → Background in the app to grant Ignore battery optimizations and, where exposed, Autostart.
PoC radios and 32-bit devices
Many PoC (push-to-talk over cellular) radios don’t ship with the Google Play Store, and most run an older 32-bit build of Android that the Play release can’t install. For these, VoxDMR also publishes a standalone APK on GitHub Releases.
If you’re installing on a PoC radio (or any 32-bit Android device), sideload the non-Play-Store build:
- On the radio, open the latest release page.
- Download the 32-bit (
armeabi-v7a) APK. Most PoC radios are 32-bit, so if you’re unsure, pick this one — the 64-bit (arm64-v8a) build will not install on a 32-bit device. - When Android prompts, allow installs from your browser or file manager (Settings → Apps → Special access → Install unknown apps).
- Open the downloaded APK and tap Install, then launch the app.
First launch works exactly as it does for the Play Store install above: the same setup wizard, which is built to be driven with a D-pad as well as a touchscreen.
Where Android stores things
App data lives in the standard Android app-private directory. Uninstalling the app removes config, firmware, and logs.
VoxDMR Desktop ships as a single self-contained binary. No installer, no package manager, no system services. Download, verify, run.
Platform requirements
- Linux: ALSA support (
libasound2on Debian/Ubuntu/Mint;alsa-libon Arch; built into most distros). - Windows: Windows 10 1809 or later (x64). All other dependencies are statically linked.
Linux (x86_64)
# Download
curl -LO https://github.com/jcalado/voxdmr-site/releases/latest/download/VoxDMR-linux-x86_64
curl -LO https://github.com/jcalado/voxdmr-site/releases/latest/download/SHA256SUMS

# Verify
sha256sum -c SHA256SUMS --ignore-missing

# Run
chmod +x VoxDMR-linux-x86_64
./VoxDMR-linux-x86_64
Windows (x86_64)
- Open the latest release page.
- Download
VoxDMR-windows-x86_64.exe. - Optional but recommended: also download
SHA256SUMSand verify in PowerShell:$expected = (Get-Content SHA256SUMS | Select-String 'VoxDMR-windows-x86_64.exe').ToString().Split(' ')[0] $actual = (Get-FileHash .\VoxDMR-windows-x86_64.exe -Algorithm SHA256).Hash.ToLower() if ($expected -eq $actual) { "OK" } else { "MISMATCH" } - Double-click
VoxDMR-windows-x86_64.exeto launch.
The first time you run it, Windows SmartScreen may warn you the app is from an “unknown publisher”. VoxDMR isn’t code-signed yet. Click More info → Run anyway to continue.
Where VoxDMR Desktop stores things
VoxDMR follows OS conventions for config, data, and logs:
| Type | Linux | Windows | macOS¹ |
|---|---|---|---|
| Firmware | ~/.local/share/voxdmr/firmware/ | %APPDATA%\voxdmr\firmware\ | ~/Library/Application Support/voxdmr/firmware/ |
| Config | ~/.config/voxdmr/ | %APPDATA%\voxdmr\ | ~/Library/Application Support/voxdmr/ |
| Logs | ~/.local/state/voxdmr/logs/ | %LOCALAPPDATA%\voxdmr\logs\ | ~/Library/Logs/voxdmr/ |
¹ macOS isn’t currently a release target. Paths are listed for future reference.
To override the firmware location (e.g. for packagers or sandboxed installs), set VOXDMR_FIRMWARE_DIR before launching:
VOXDMR_FIRMWARE_DIR=/opt/voxdmr/firmware ./VoxDMR-linux-x86_64The app also looks for <exe-dir>/firmware/. Drop the firmware files next to the binary for fully portable installs (USB stick, archived bundle, etc.).
Updating
Recent desktop builds include an in-app auto-update — on launch (and from Settings → About → Check for updates), VoxDMR offers to download and atomically swap in the new build for you, SHA-verified end-to-end. You can also still upgrade manually: download the new binary from the releases page, replace the old binary, and launch. Config, talkgroup favorites, profiles, aliases, and firmware are preserved across updates.
Uninstall
VoxDMR Desktop is a single binary with no installer. Delete the binary to remove the app. To also remove your config, firmware, and logs, delete the three directories listed above.
First launch: the setup wizard
The first time VoxDMR starts with no saved profile it opens a guided setup, instead of dropping you on an empty settings screen. Work through it once and you come out with a saved profile, your talkgroups pinned, the Parrot echo test wired up, a checked microphone, and — if you entered a password — a live connection.
Nothing you pick here is permanent; all of it lives in Settings afterwards.
Seven numbered steps at most, bookended by a welcome screen and a summary. Two of them are conditional — the Vocoder step only appears if the firmware isn’t installed yet, and the account step only for networks that need one — so a second run against FreeDMR is five.
Five numbered steps at most, ending on a summary. The Vocoder step only appears if the firmware isn’t installed yet, so a second run is four.
Vocoder — the one-time firmware install
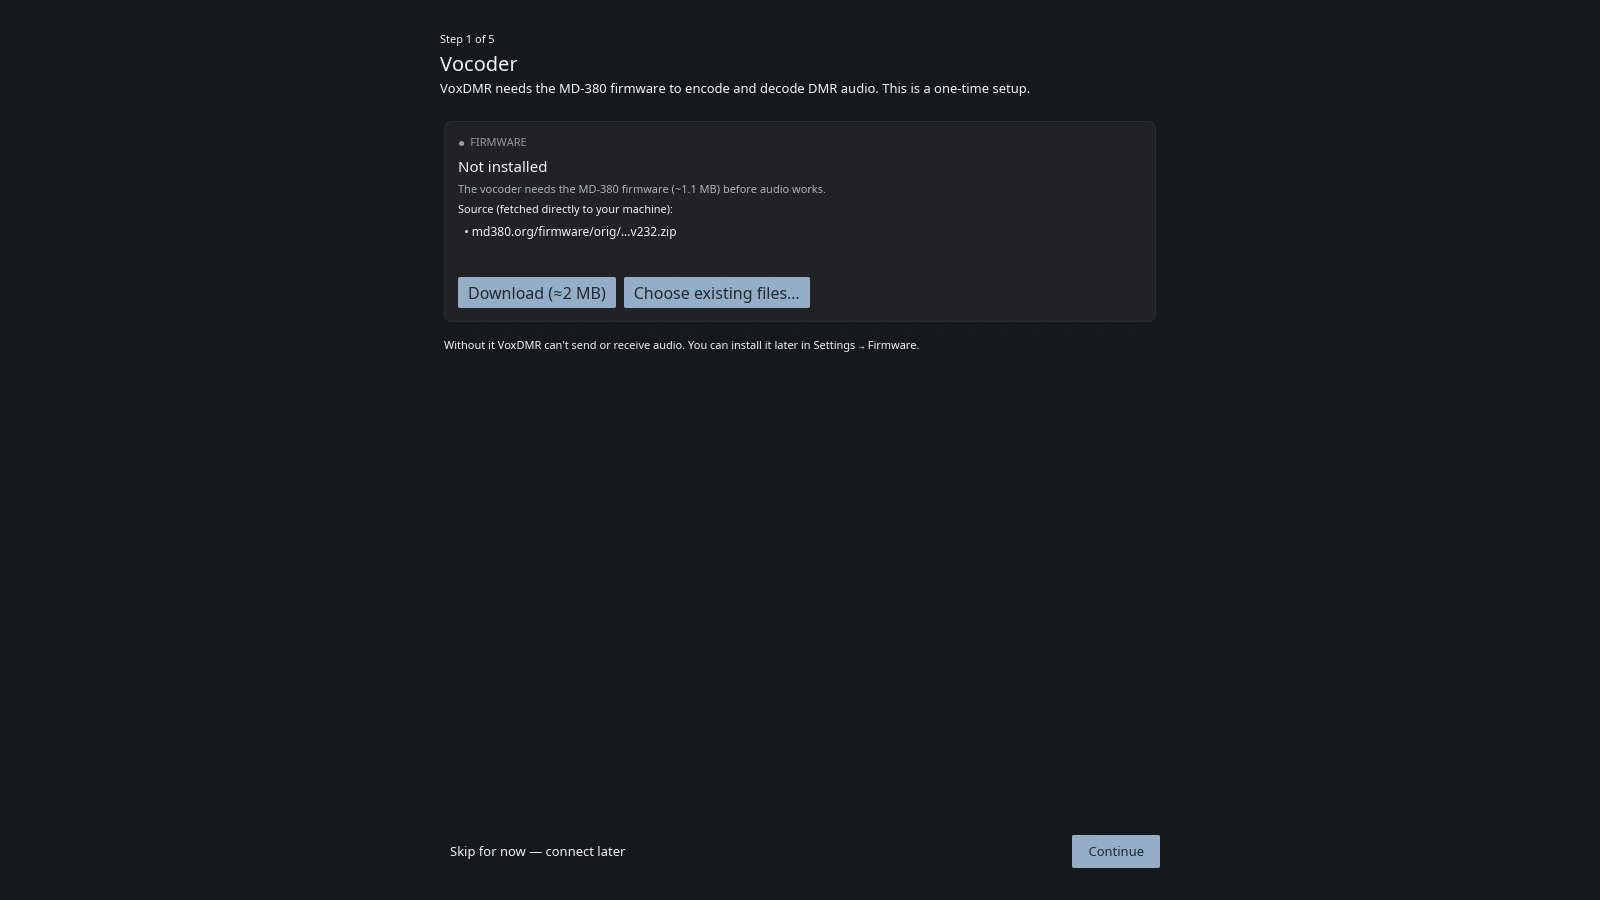
VoxDMR needs the MD-380 firmware to encode and decode DMR audio: that is the AMBE+2 vocoder. It is not bundled with the app — for legal reasons VoxDMR fetches it directly from third-party sources to your device and never proxies the bytes through us. Whichever route you take, it is SHA-256 verified before it is written to disk.
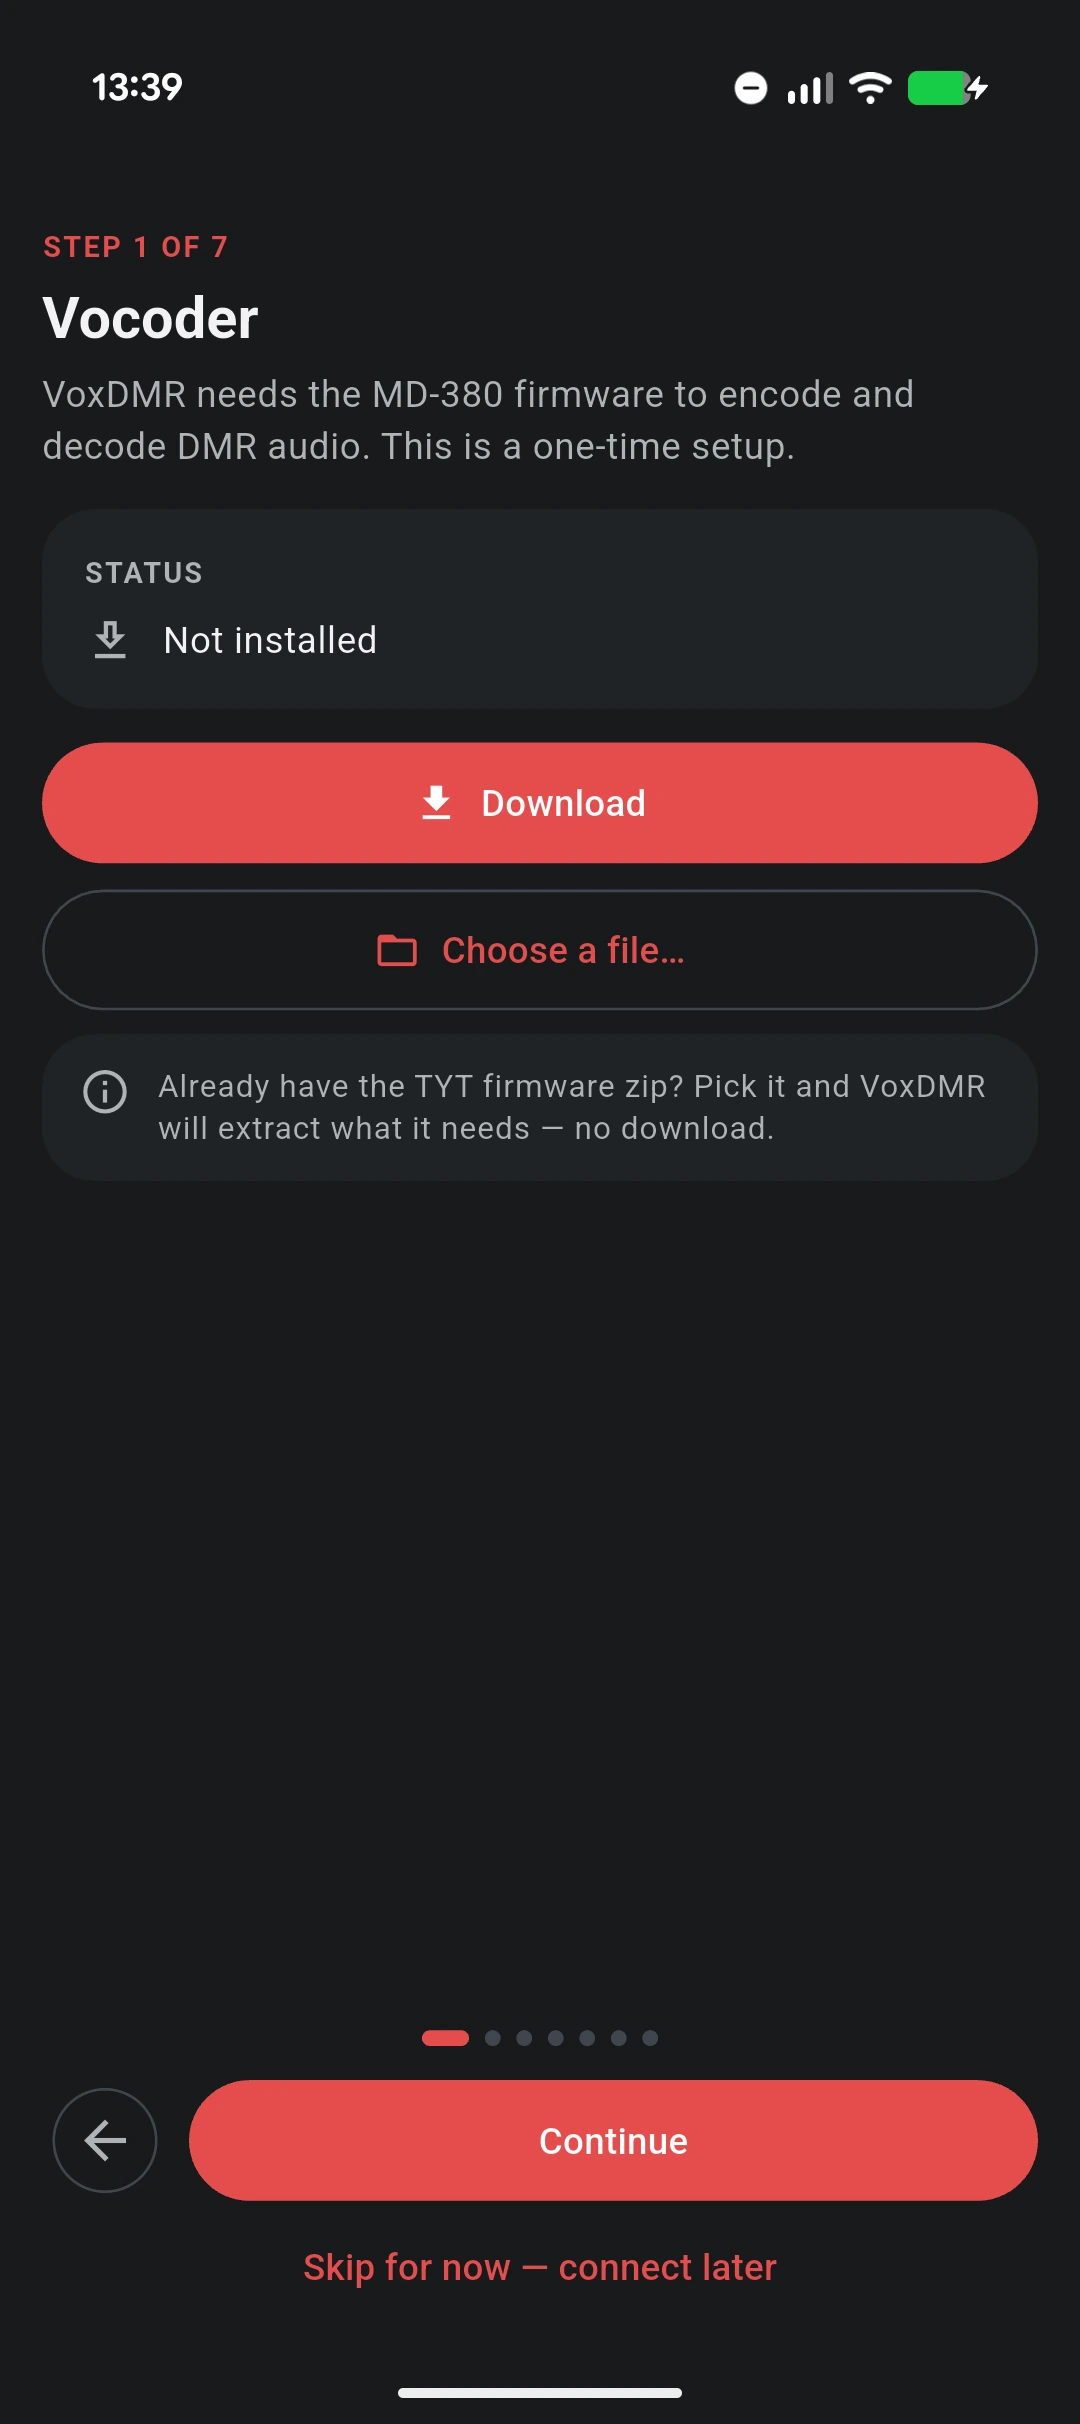
Two ways through:
- Download (recommended) fetches the firmware archive from md380.org — roughly 2 MB over the wire — and unwraps it to a single 994 KB
D002.032.bin. A few seconds on a normal connection. - The file picker beside it is the escape hatch when the machine can’t reach that URL — corporate proxy, offline, restricted firewall. It takes the TYT firmware zip, the wrapped OEM
.bin, or an already-unwrappedD002.032.bin; it isn’t filtered by extension, because people rename downloads, so VoxDMR sniffs the contents and works out which of the three you handed it.
The buttons read Download and Choose a file…, and the status card goes Not installed → a progress bar → Installed and verified.
The buttons read Download (≈2 MB) and Choose existing files…, and the card goes Not installed → a progress bar → Ready, RX/TX audio good to go.
The step is skippable on purpose: an offline first run, or an upstream that is down, must not be a dead end. Skip it and the wizard carries on, the summary at the end warns you that audio won’t work, and you can install the firmware later under Settings → Firmware. The download also outlives the step — start it, press Continue, and it keeps running while you fill in the rest.
Upgrading from v0.13.x or earlier? Setup used to fetch a second file,
d02032-core.img. As of v0.14.0 it’s no longer downloaded or required. An existing copy on disk still works, so nothing breaks on an upgrade — you just don’t need it on a fresh install. See the changelog.
Your station — callsign and DMR ID
The two things every network needs to know about you, on one screen.
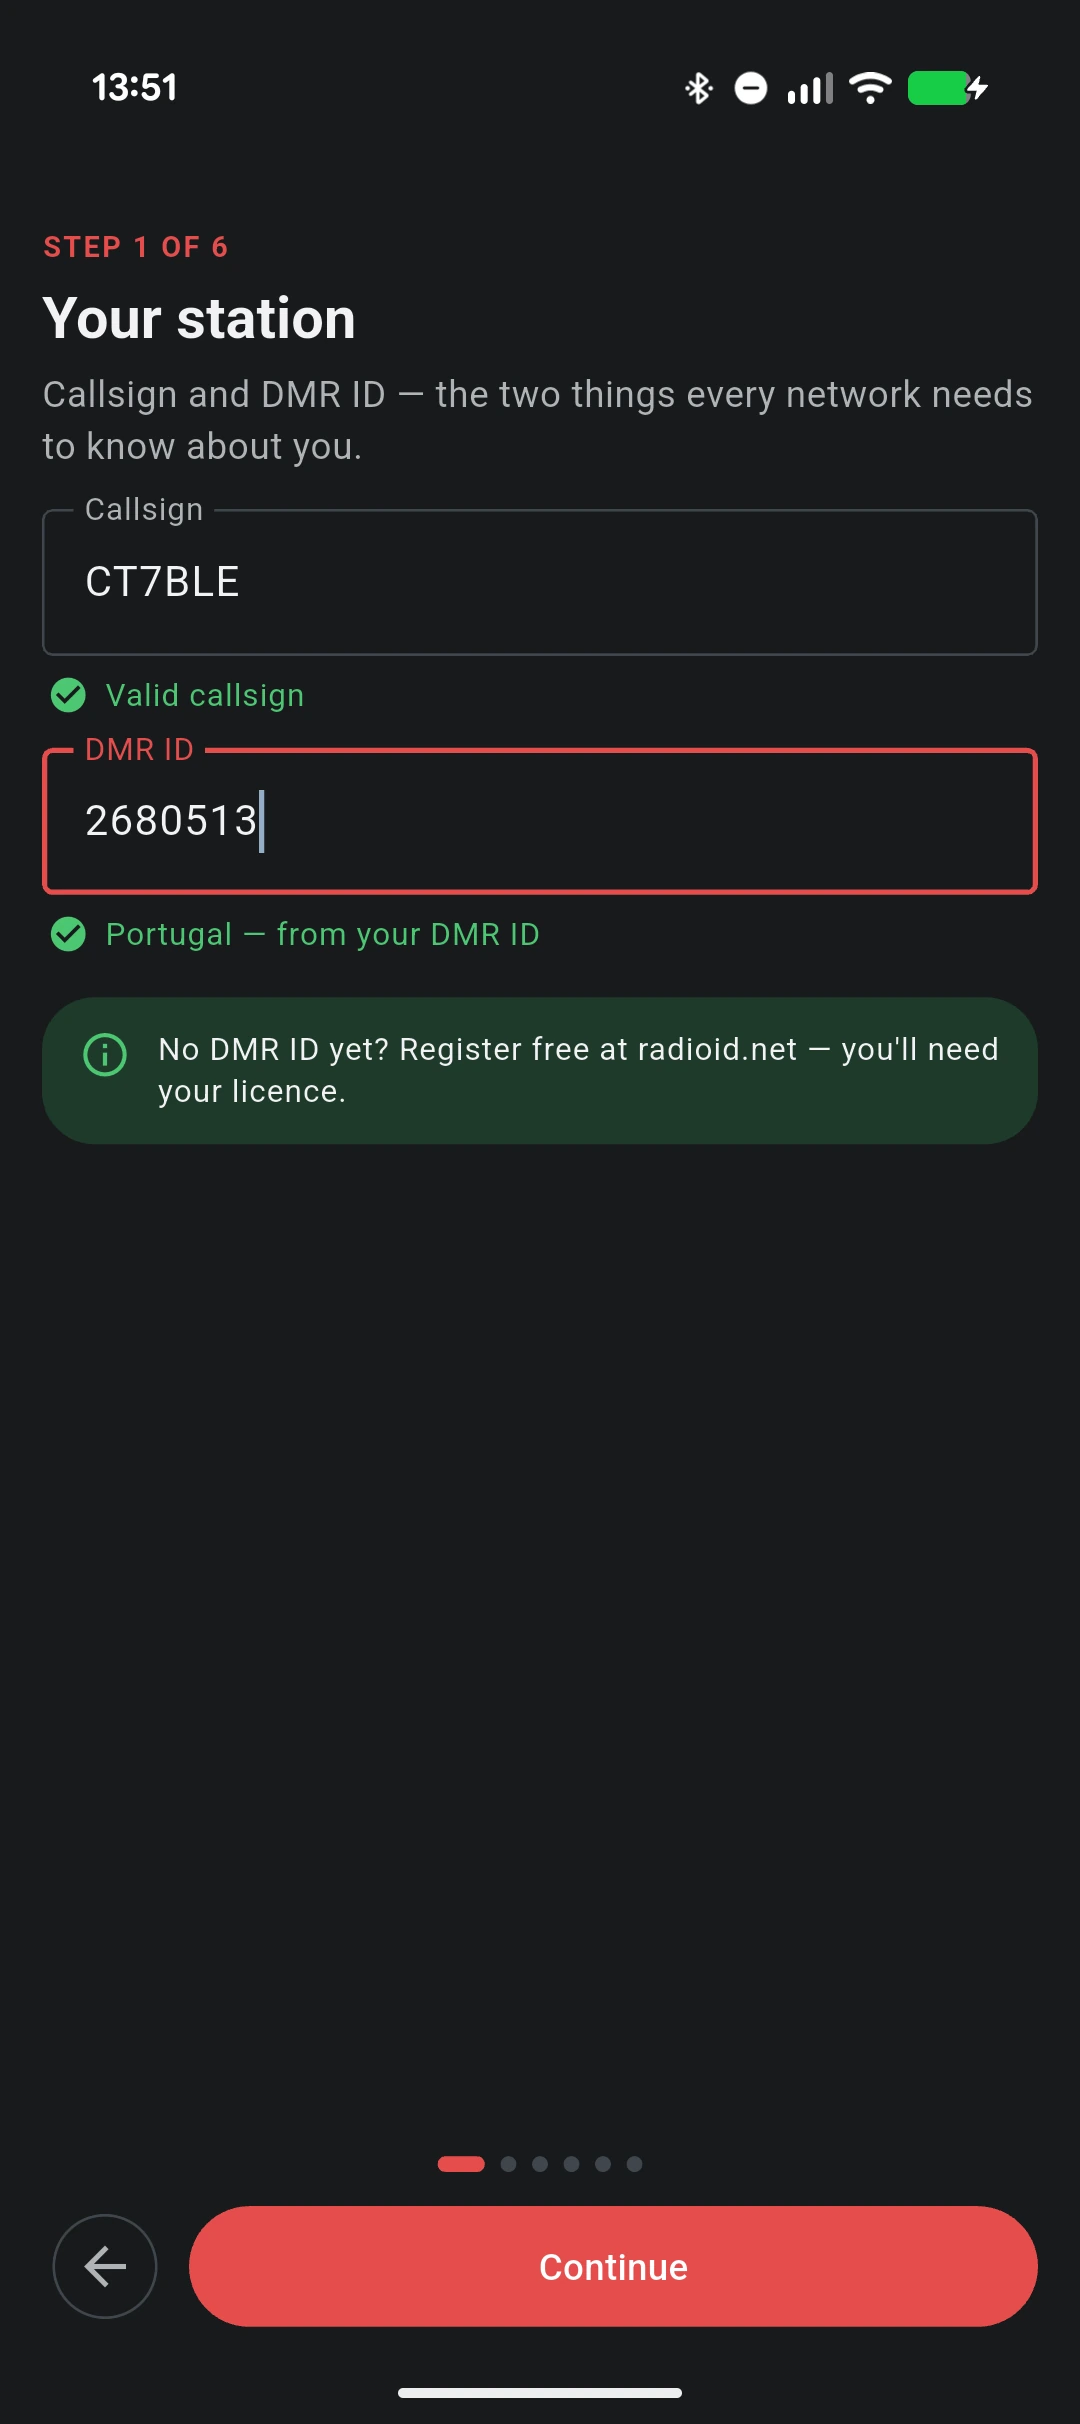
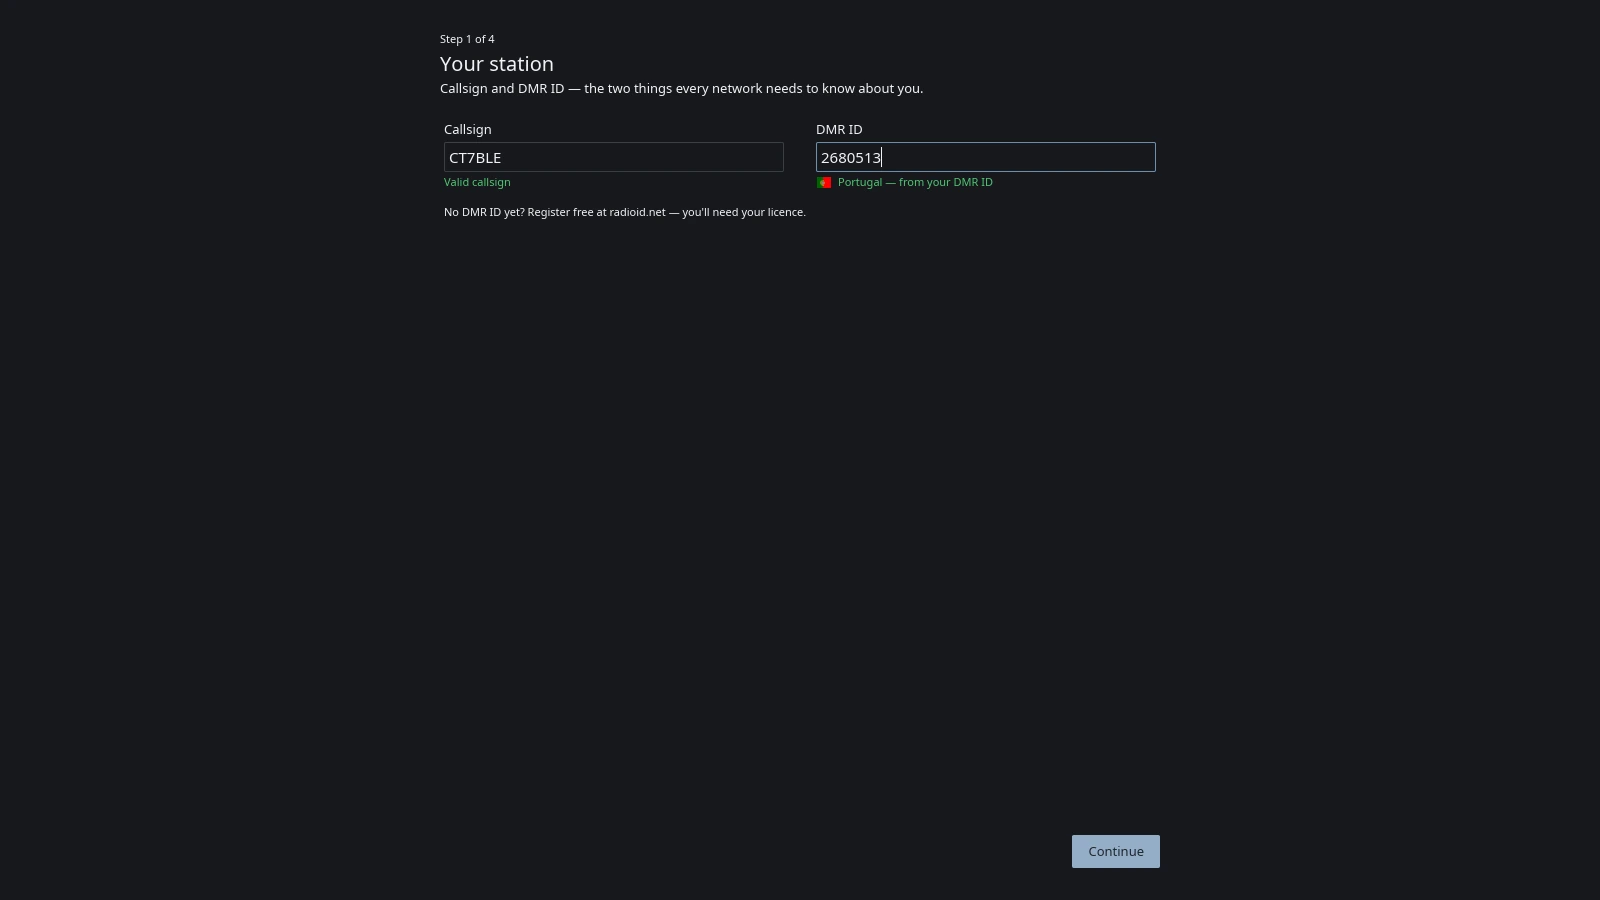
The callsign check is deliberately permissive — it catches typos, not unusual callsigns, and the network’s own check is the authoritative one anyway. The DMR ID is validated on length alone (four digits minimum); where the country prefix is one VoxDMR recognises, the field reads it back to you (Portugal — from your DMR ID). An unrecognised country is informational and never blocking.
Your DMR ID does more work here than it looks. Its country prefix is what orders the server list and seeds the talkgroup suggestions further down, so if you go back and fix a typo, everything downstream is recomputed.
No ID yet? radioid.net issues them free against your licence.
Network, and which server
Where your station connects: BrandMeister, TGIF, ADN Systems, FreeDMR, or a custom master — any Homebrew/MMDVM-compatible server of your own.
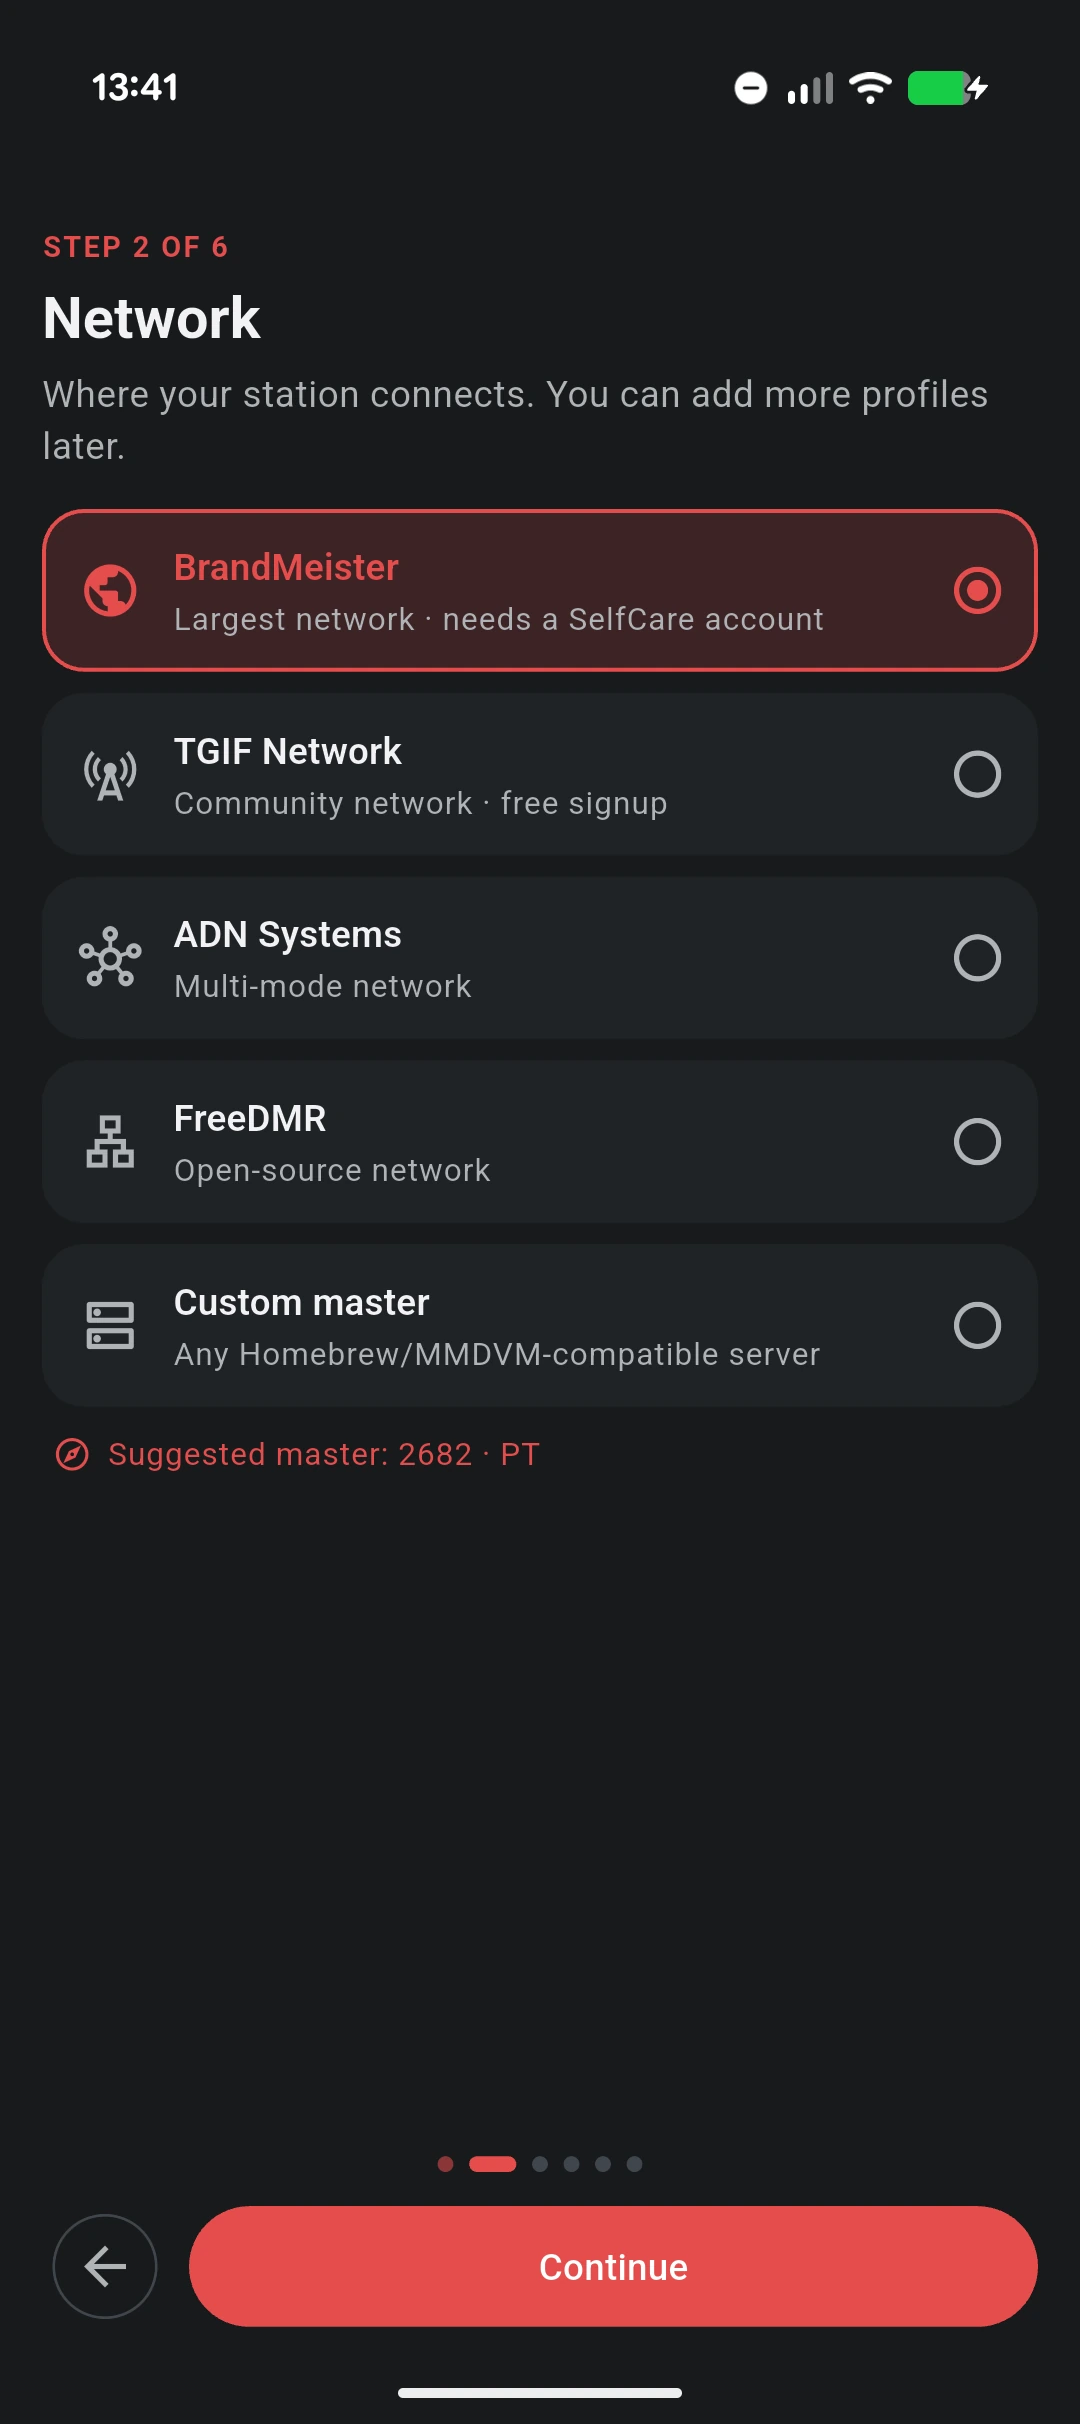
The wizard never names the wire protocol. Your choice of network decides it — Rewind for BrandMeister, Homebrew for the rest — and there is no useful decision for you to make about it. Pick BrandMeister and the suggested master for your country appears straight away, since it’s a lookup against a built-in list rather than a network call.
The server is the step after, and your country’s is already selected.
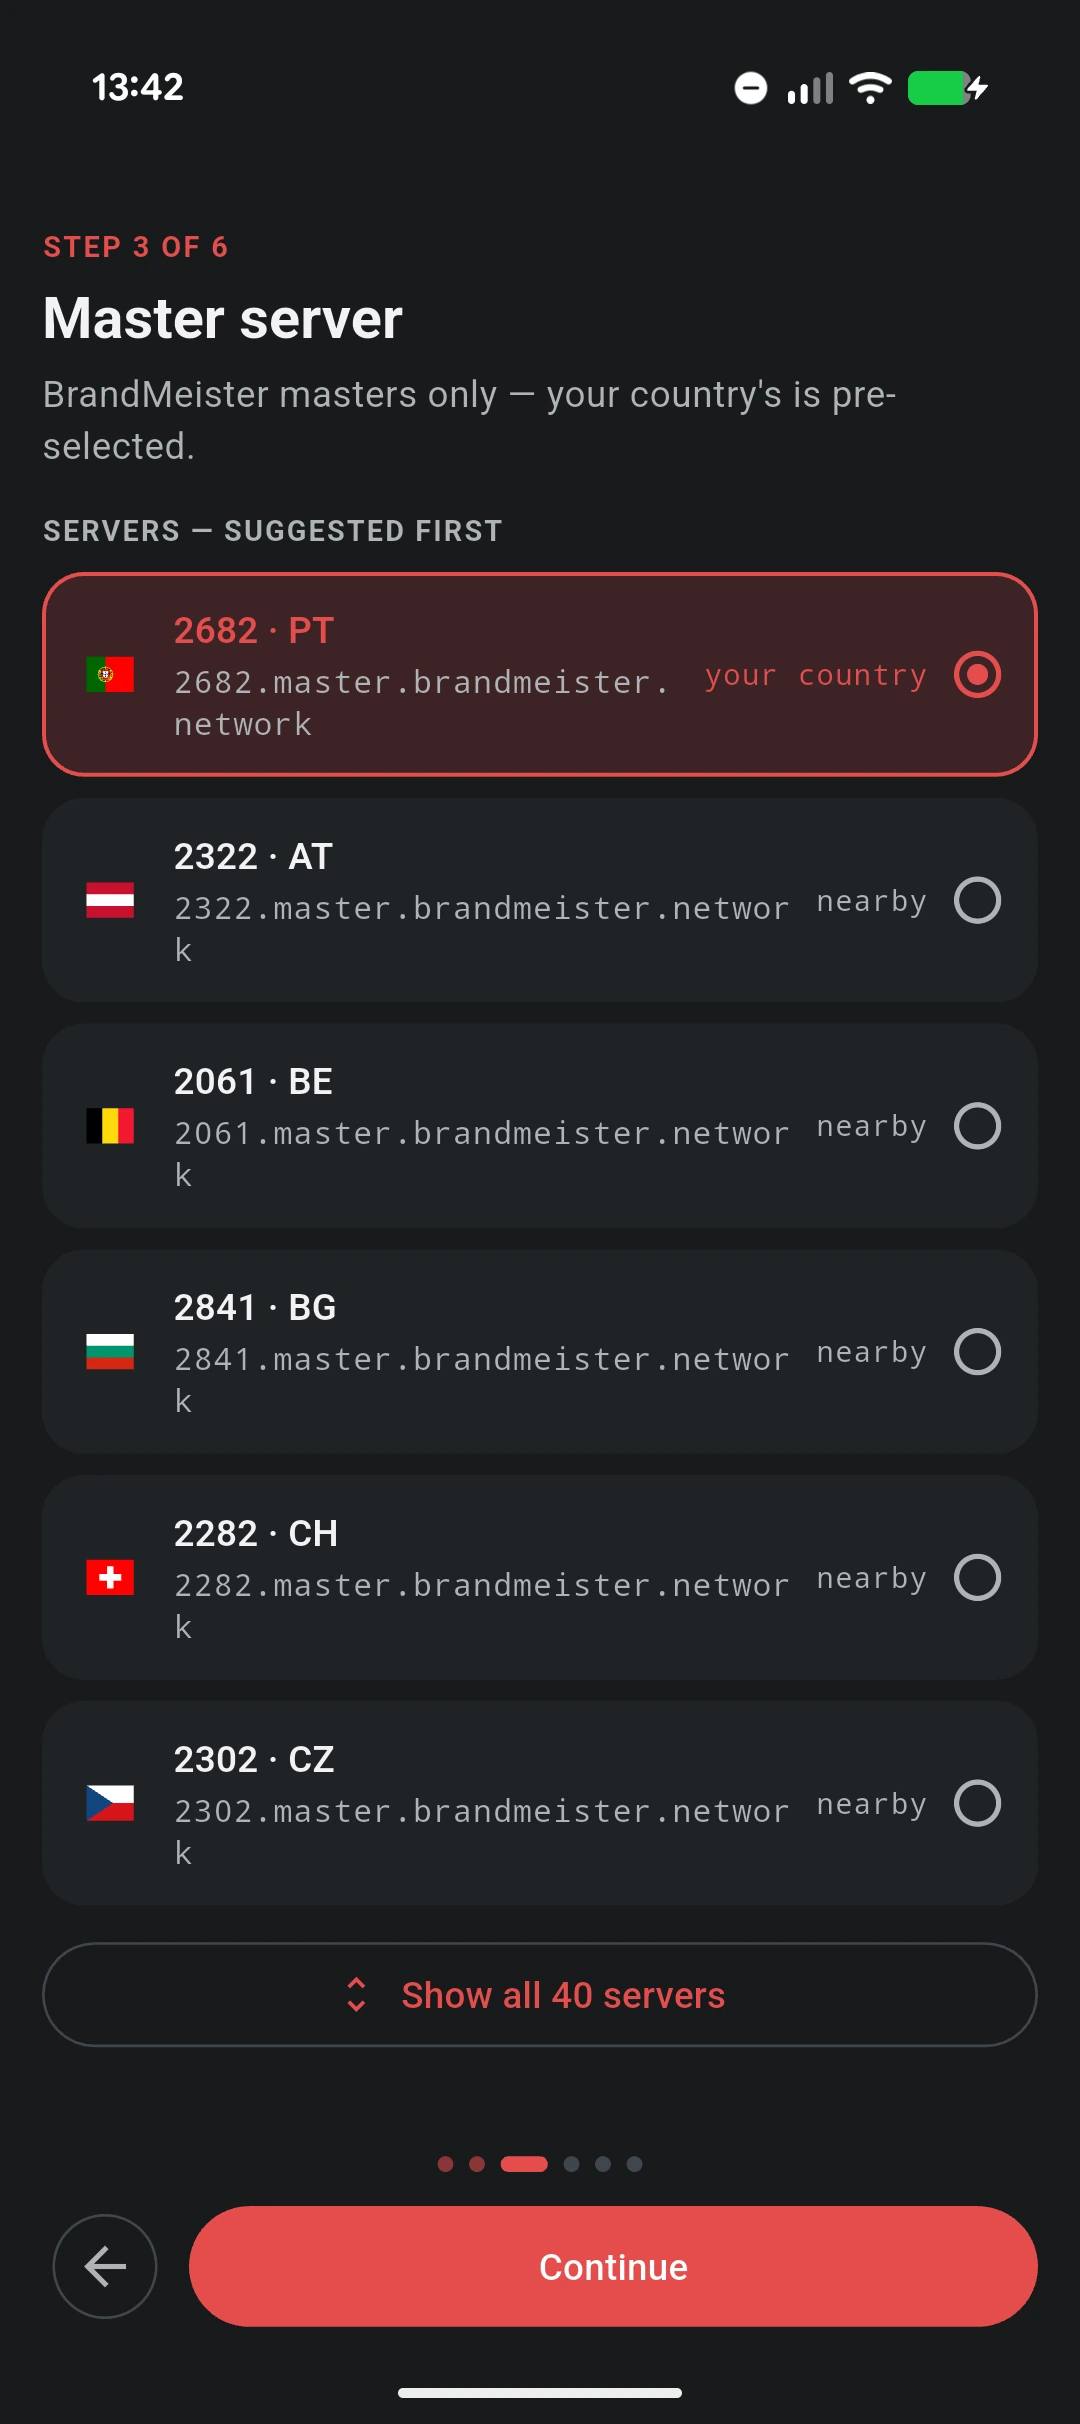
The server list sits on the same step, in a second column beside the network choice, with your country’s already selected.
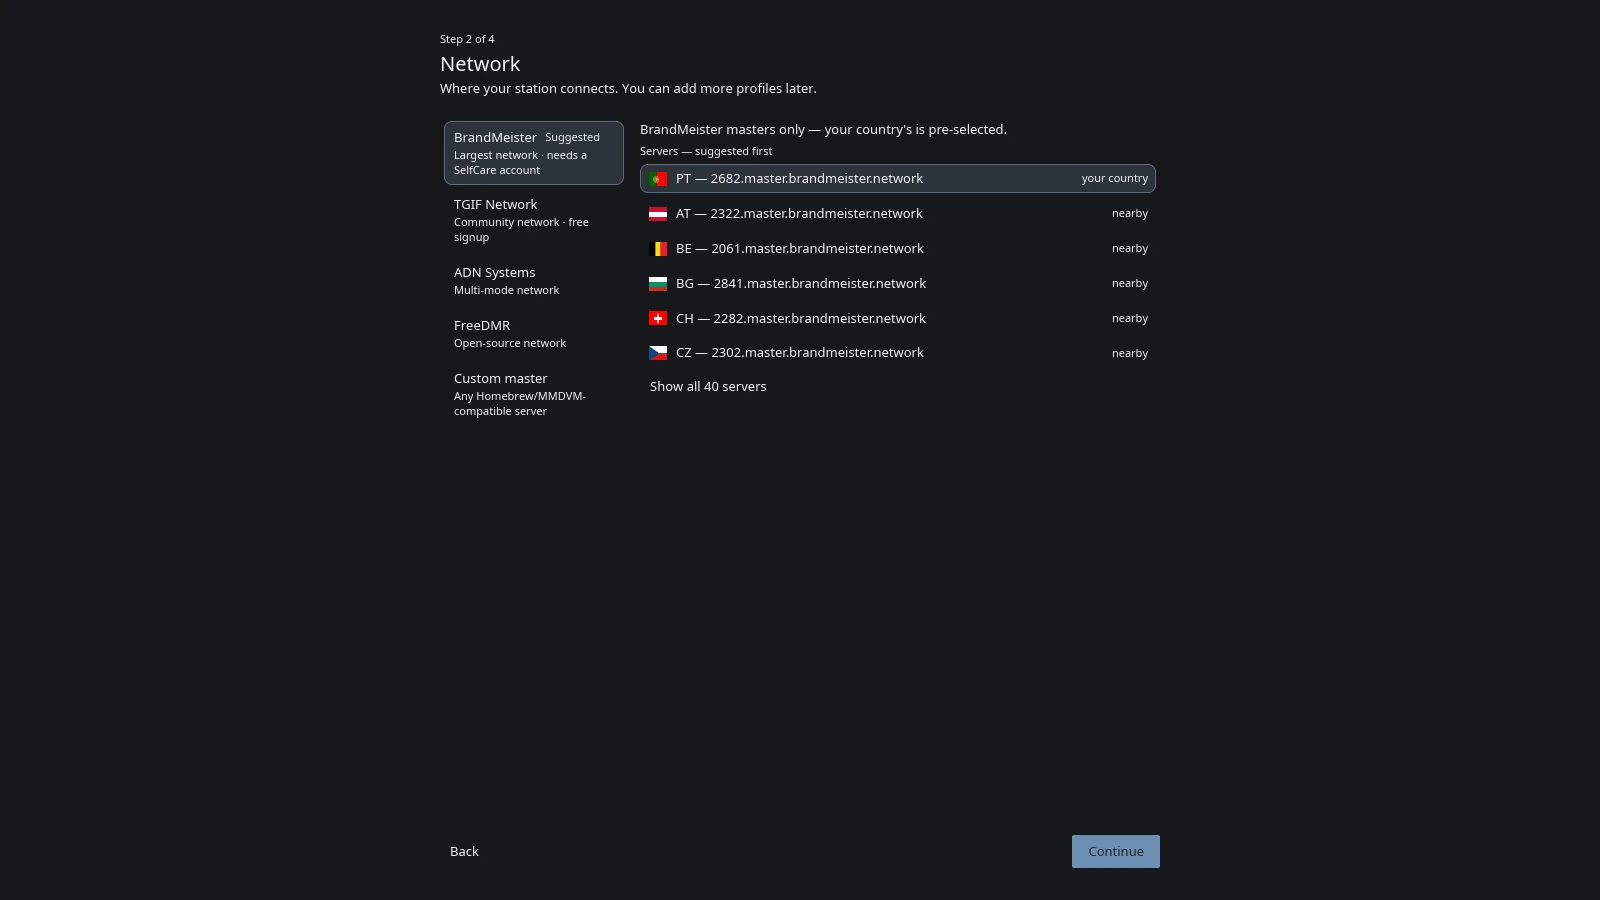
The list is ranked home country first, then the same region, then everything else, and it is capped at the first six rows until you ask for the rest — the full BrandMeister list is 40 masters, and on a keypad radio every extra row is another press. Picking a Custom master swaps the list for host, port and password fields instead.
ESSID, timeslot and static talkgroups aren’t here. They live in the profile settings after setup.
Talkgroups, and the echo test
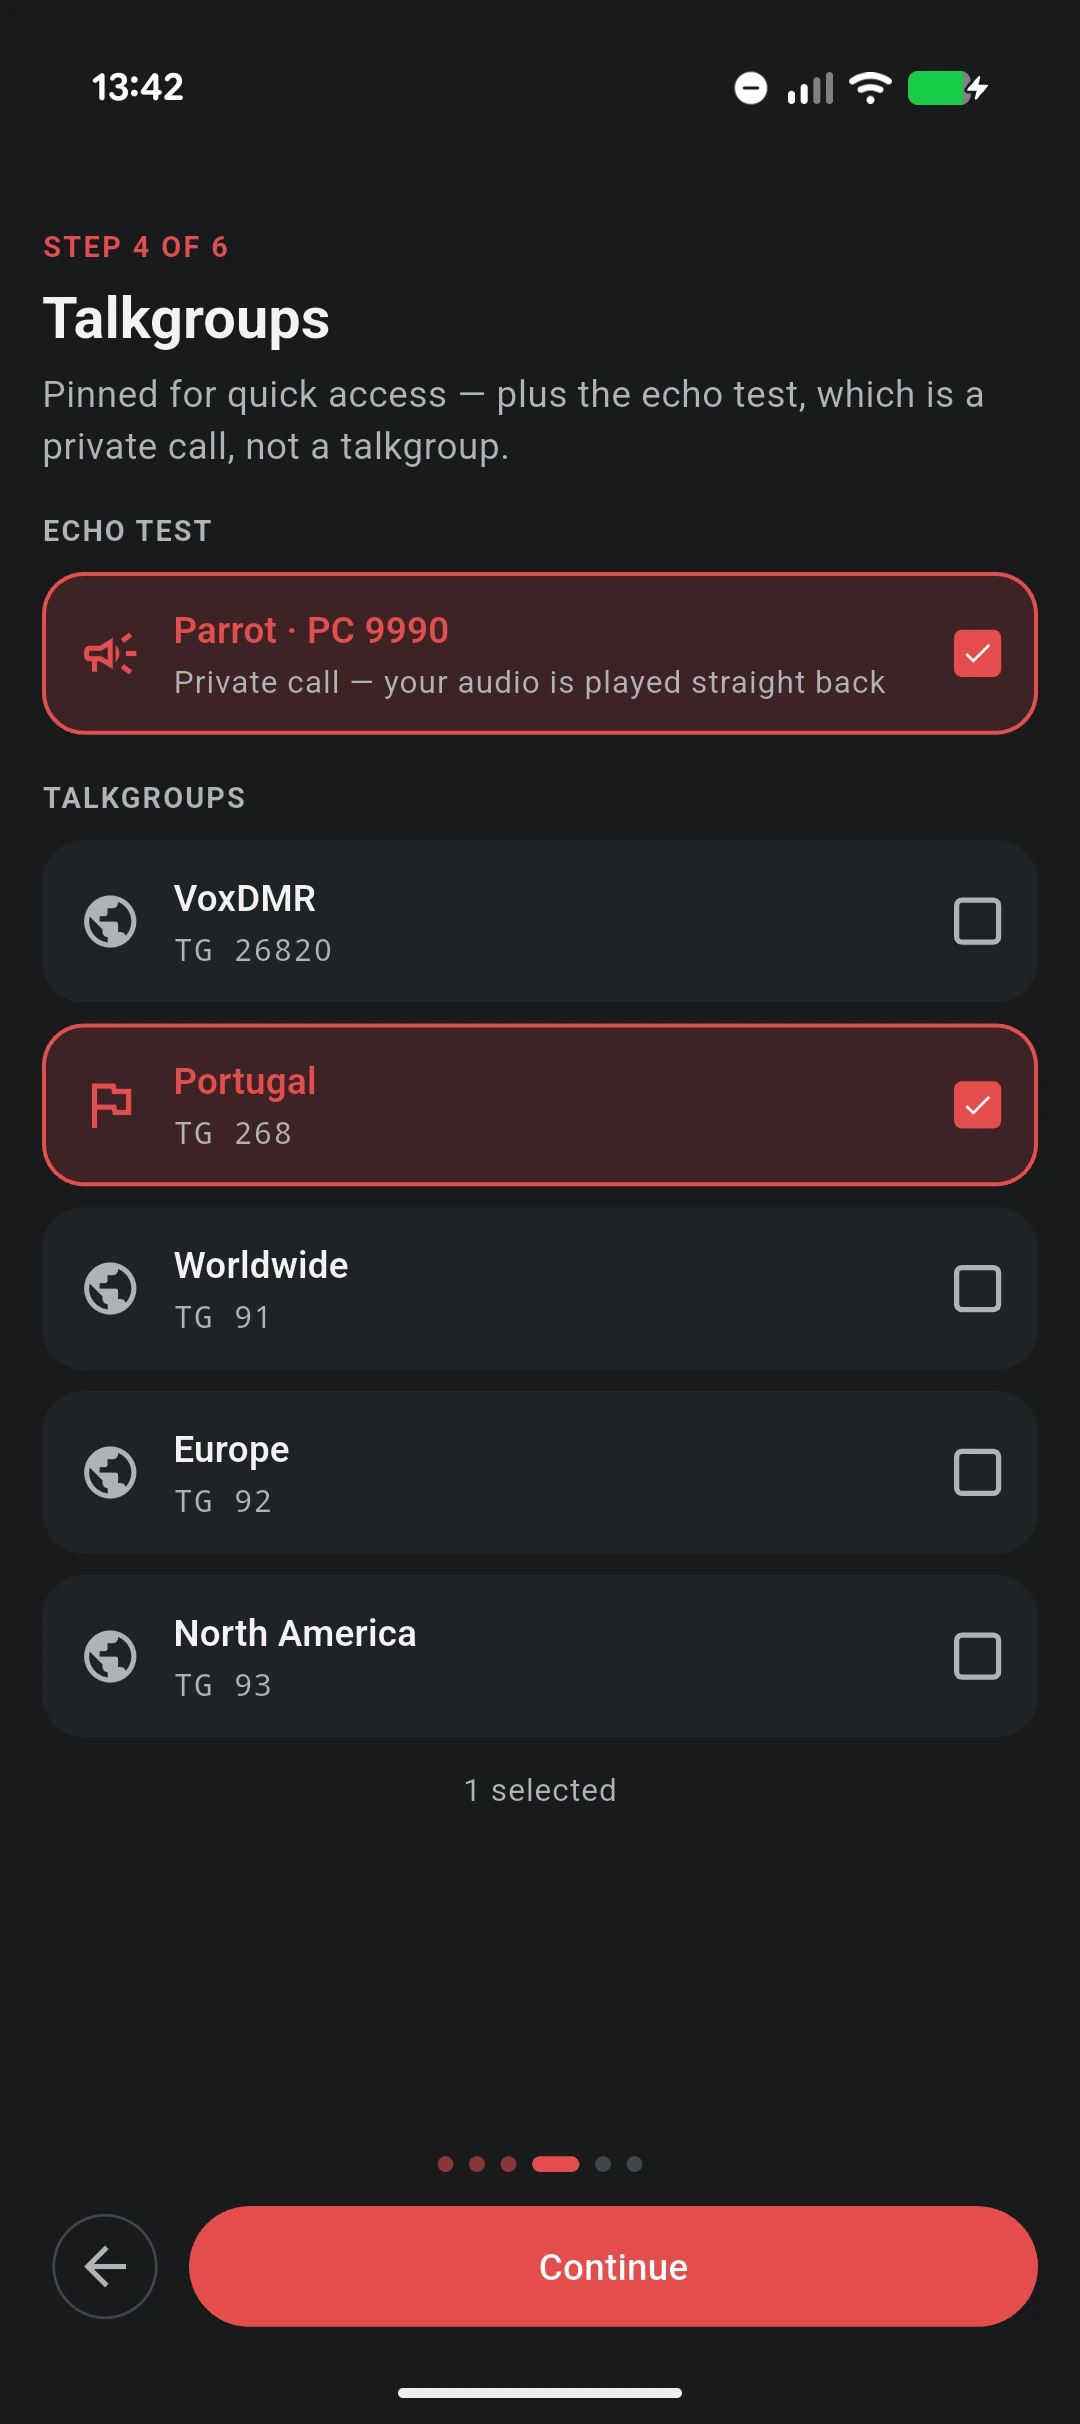
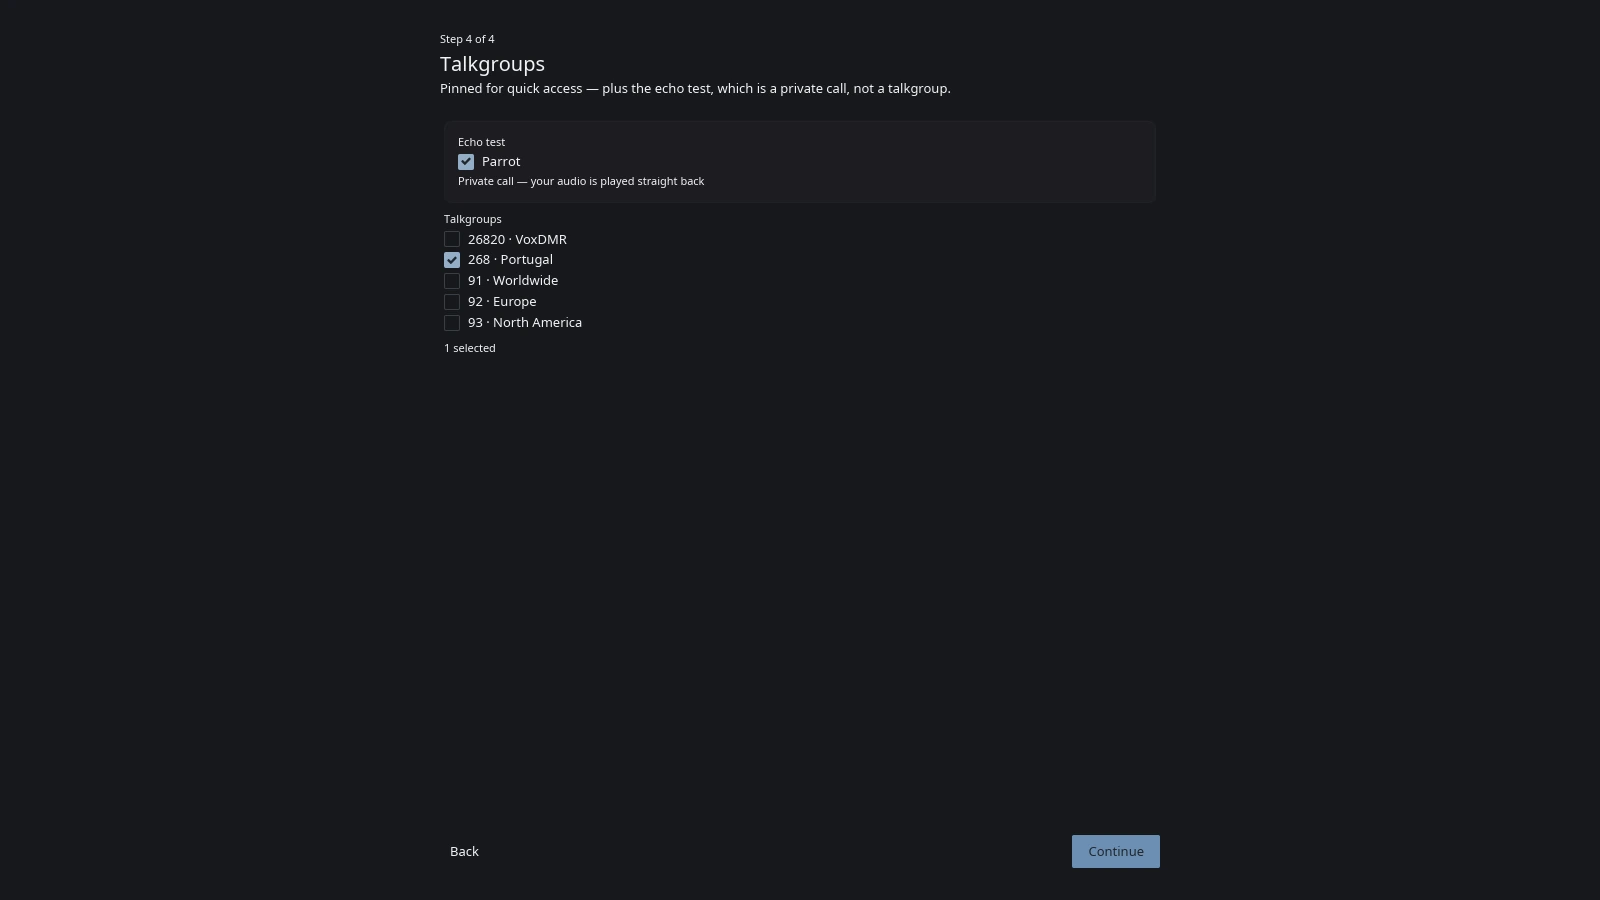
The talkgroups you tick are pinned as favourites for quick access — the suggestions are drawn from your DMR ID’s country and the network you picked, and your national talkgroup is ticked for you the first time you reach the step. Untick it and it stays unticked; the wizard won’t re-tick something you deliberately cleared.
Parrot sits in its own card, above the talkgroups, because it isn’t one. 9990 is addressed as a private call, not a group call. Filing it with the talkgroups is exactly the mistake that produces a first “why can’t I hear myself” — so the wizard separates the two, and saves Parrot to the profile’s private favourites. Leave it ticked: it’s how you prove the whole chain works, at the end.
Parrot on its own is enough to continue. You can hear yourself before you’ve picked anyone to talk to.
Linking your network account
Shown for networks that need an account of their own — BrandMeister and TGIF. Networks that don’t (ADN, FreeDMR, a custom master) skip it.
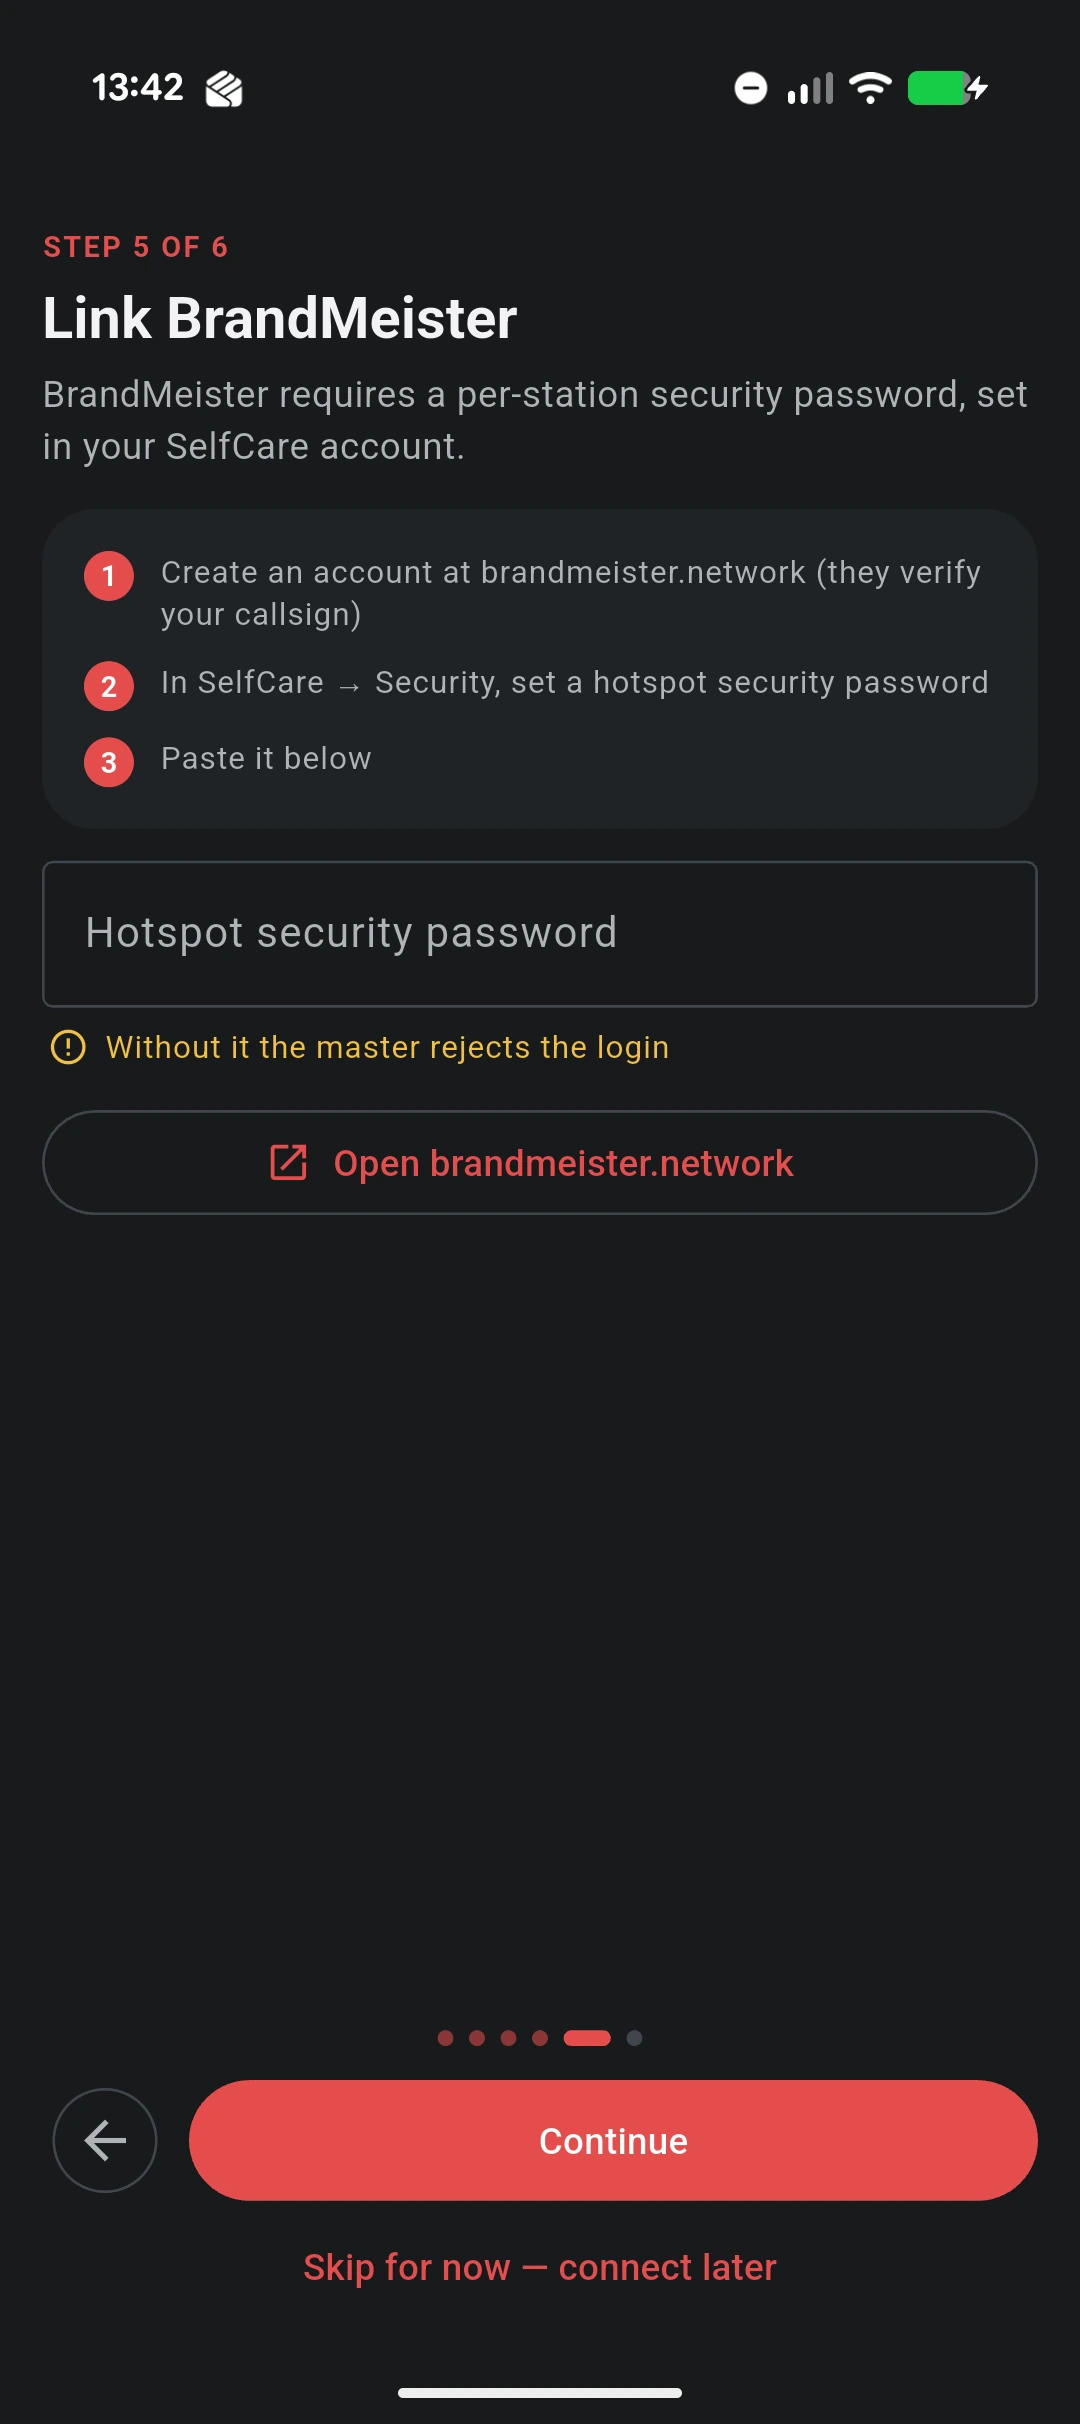
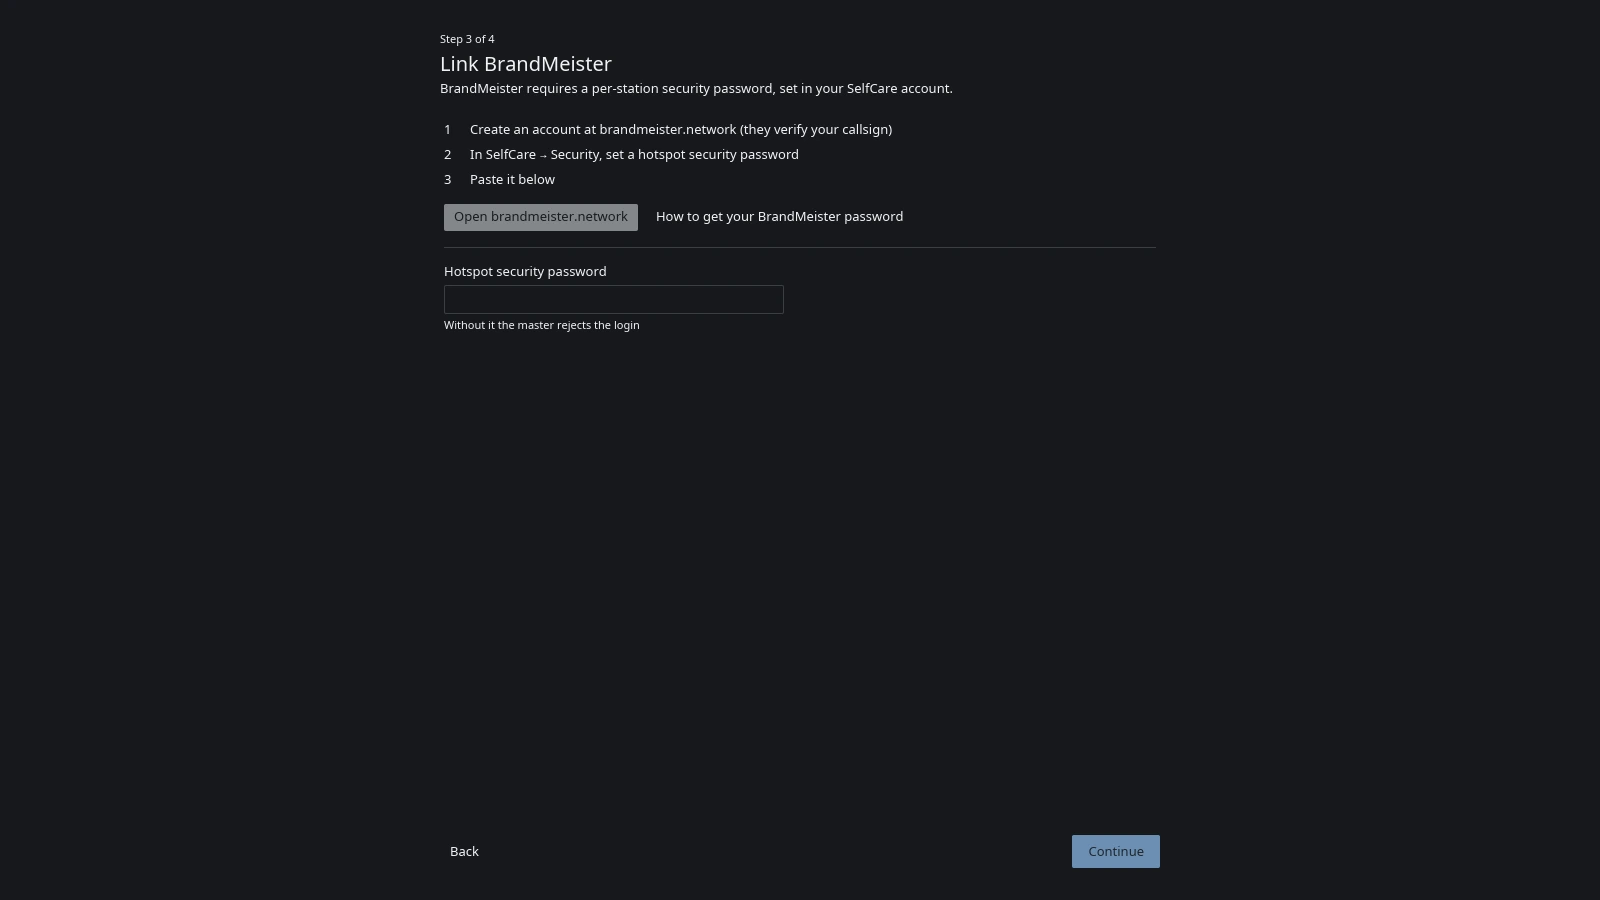
A Homebrew or Rewind login fails without a per-station password that you have to create on the network’s own website, and nothing in the app can do it for you. Leaving people to work that out from a failed login is the single biggest first-run failure, so the wizard names the exact menu path — for BrandMeister, SelfCare → Security → hotspot security password — and links straight out to the site.
This is not your BrandMeister account password. It’s a separate string you set yourself in SelfCare.
The step is skippable. Skip it and you still end up with a saved profile — it just can’t connect until you add the password under Settings.
Mic check
Placed last, and it asks for the microphone permission on arrival — far less alarming here than the first time you reach for PTT mid-QSO.
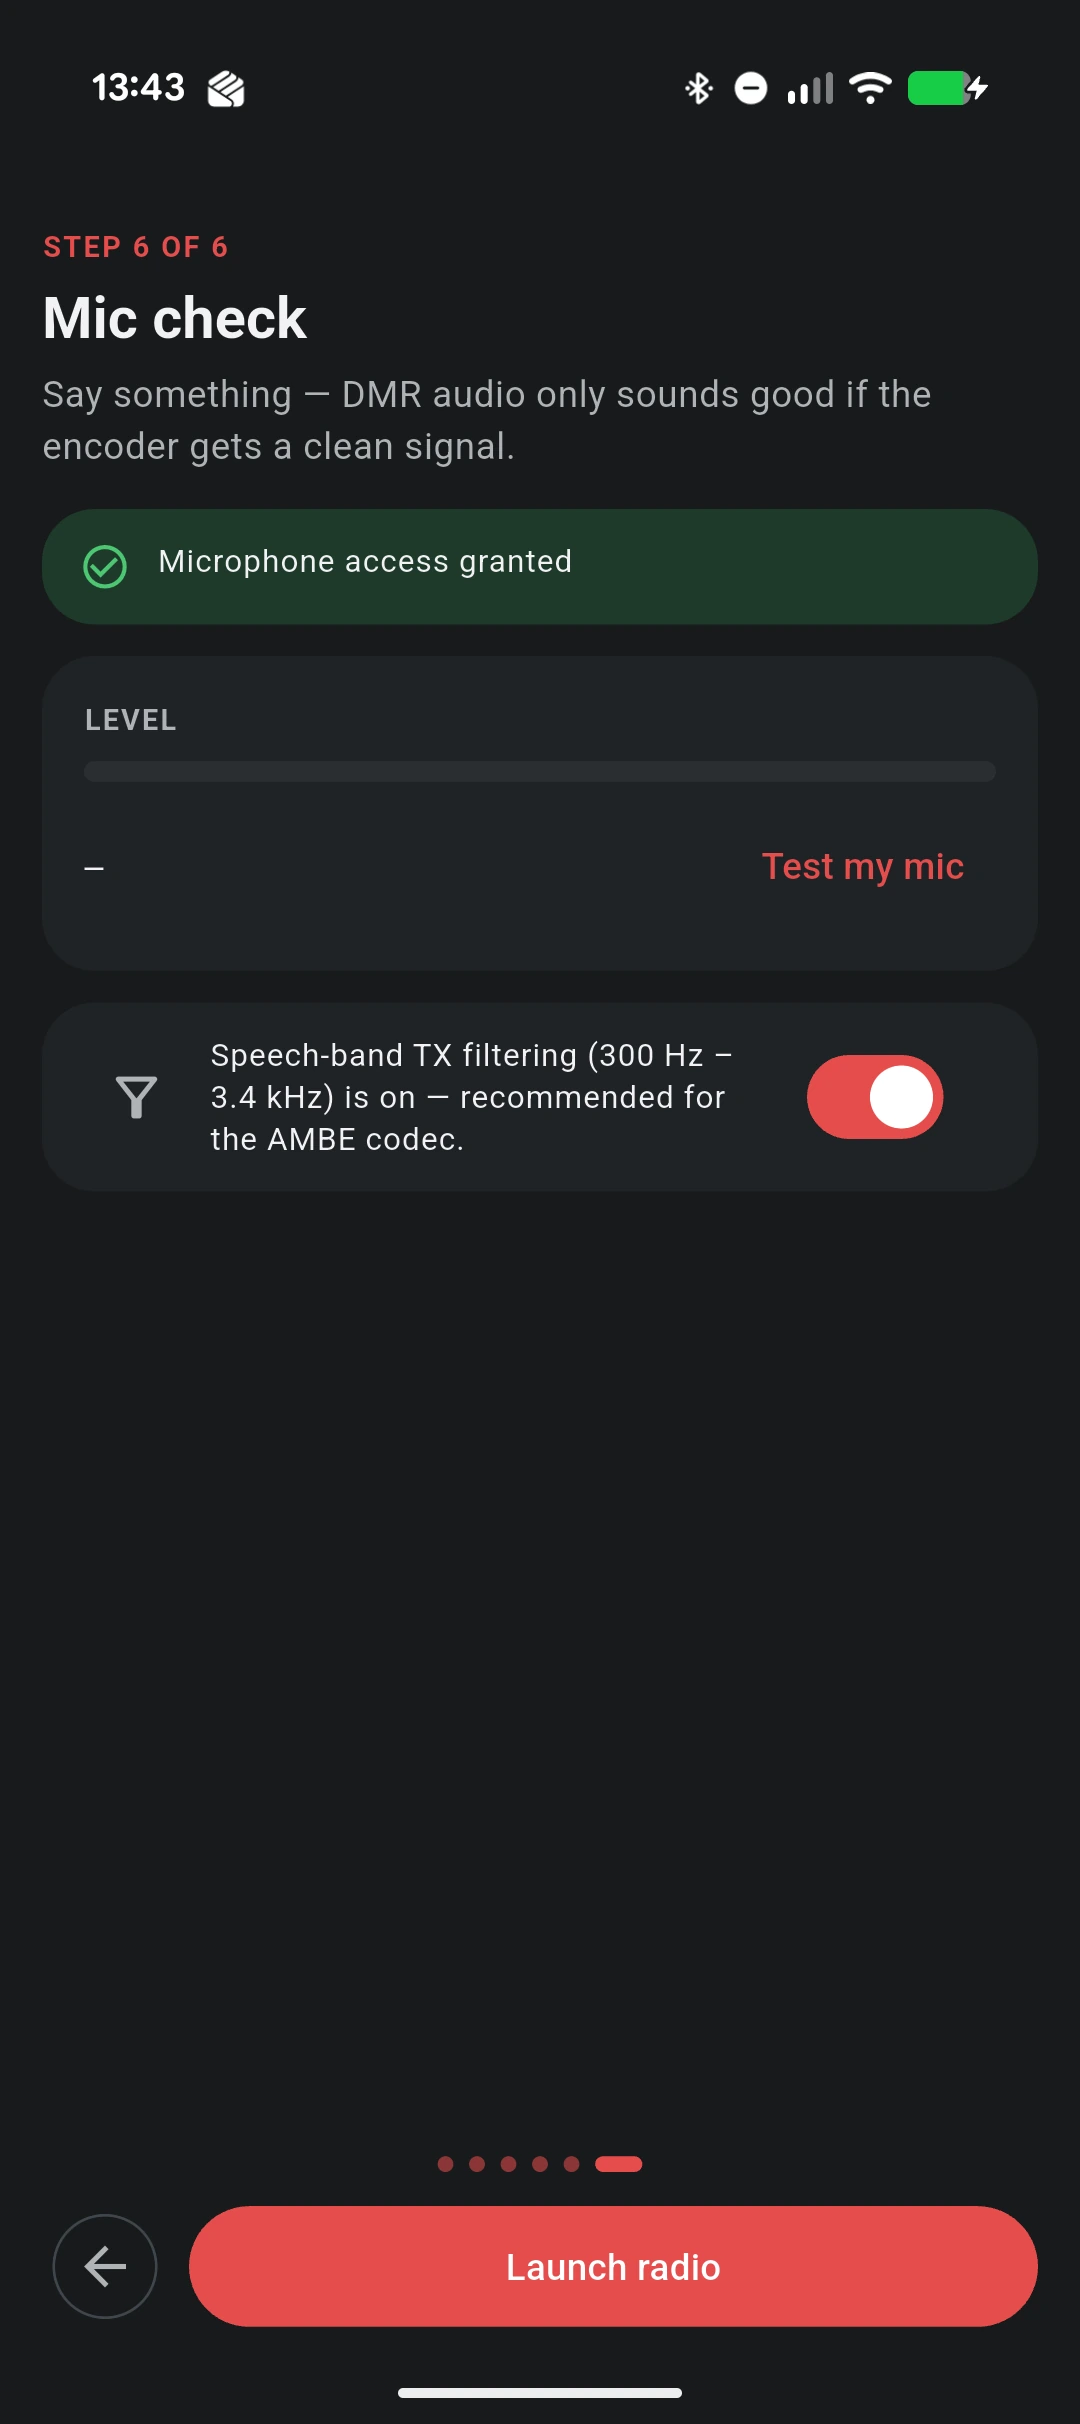
Test my mic records a couple of seconds and reports the level as good, too quiet, or too loud. Denying the permission never blocks you — it’s fixable in system settings later, and being trapped in a wizard over it would be worse.
The mic level is a live strip on the final screen rather than a step of its own, along with a picker for the input device.
DMR audio only sounds good if the encoder gets a clean signal — the AMBE codec transmits a model of your voice rather than the sound itself, so a bad input signal degrades far more than it would on FM. Speech-band TX filtering (300 Hz – 3.4 kHz) is on by default and worth leaving on. See Audio settings.
Station ready
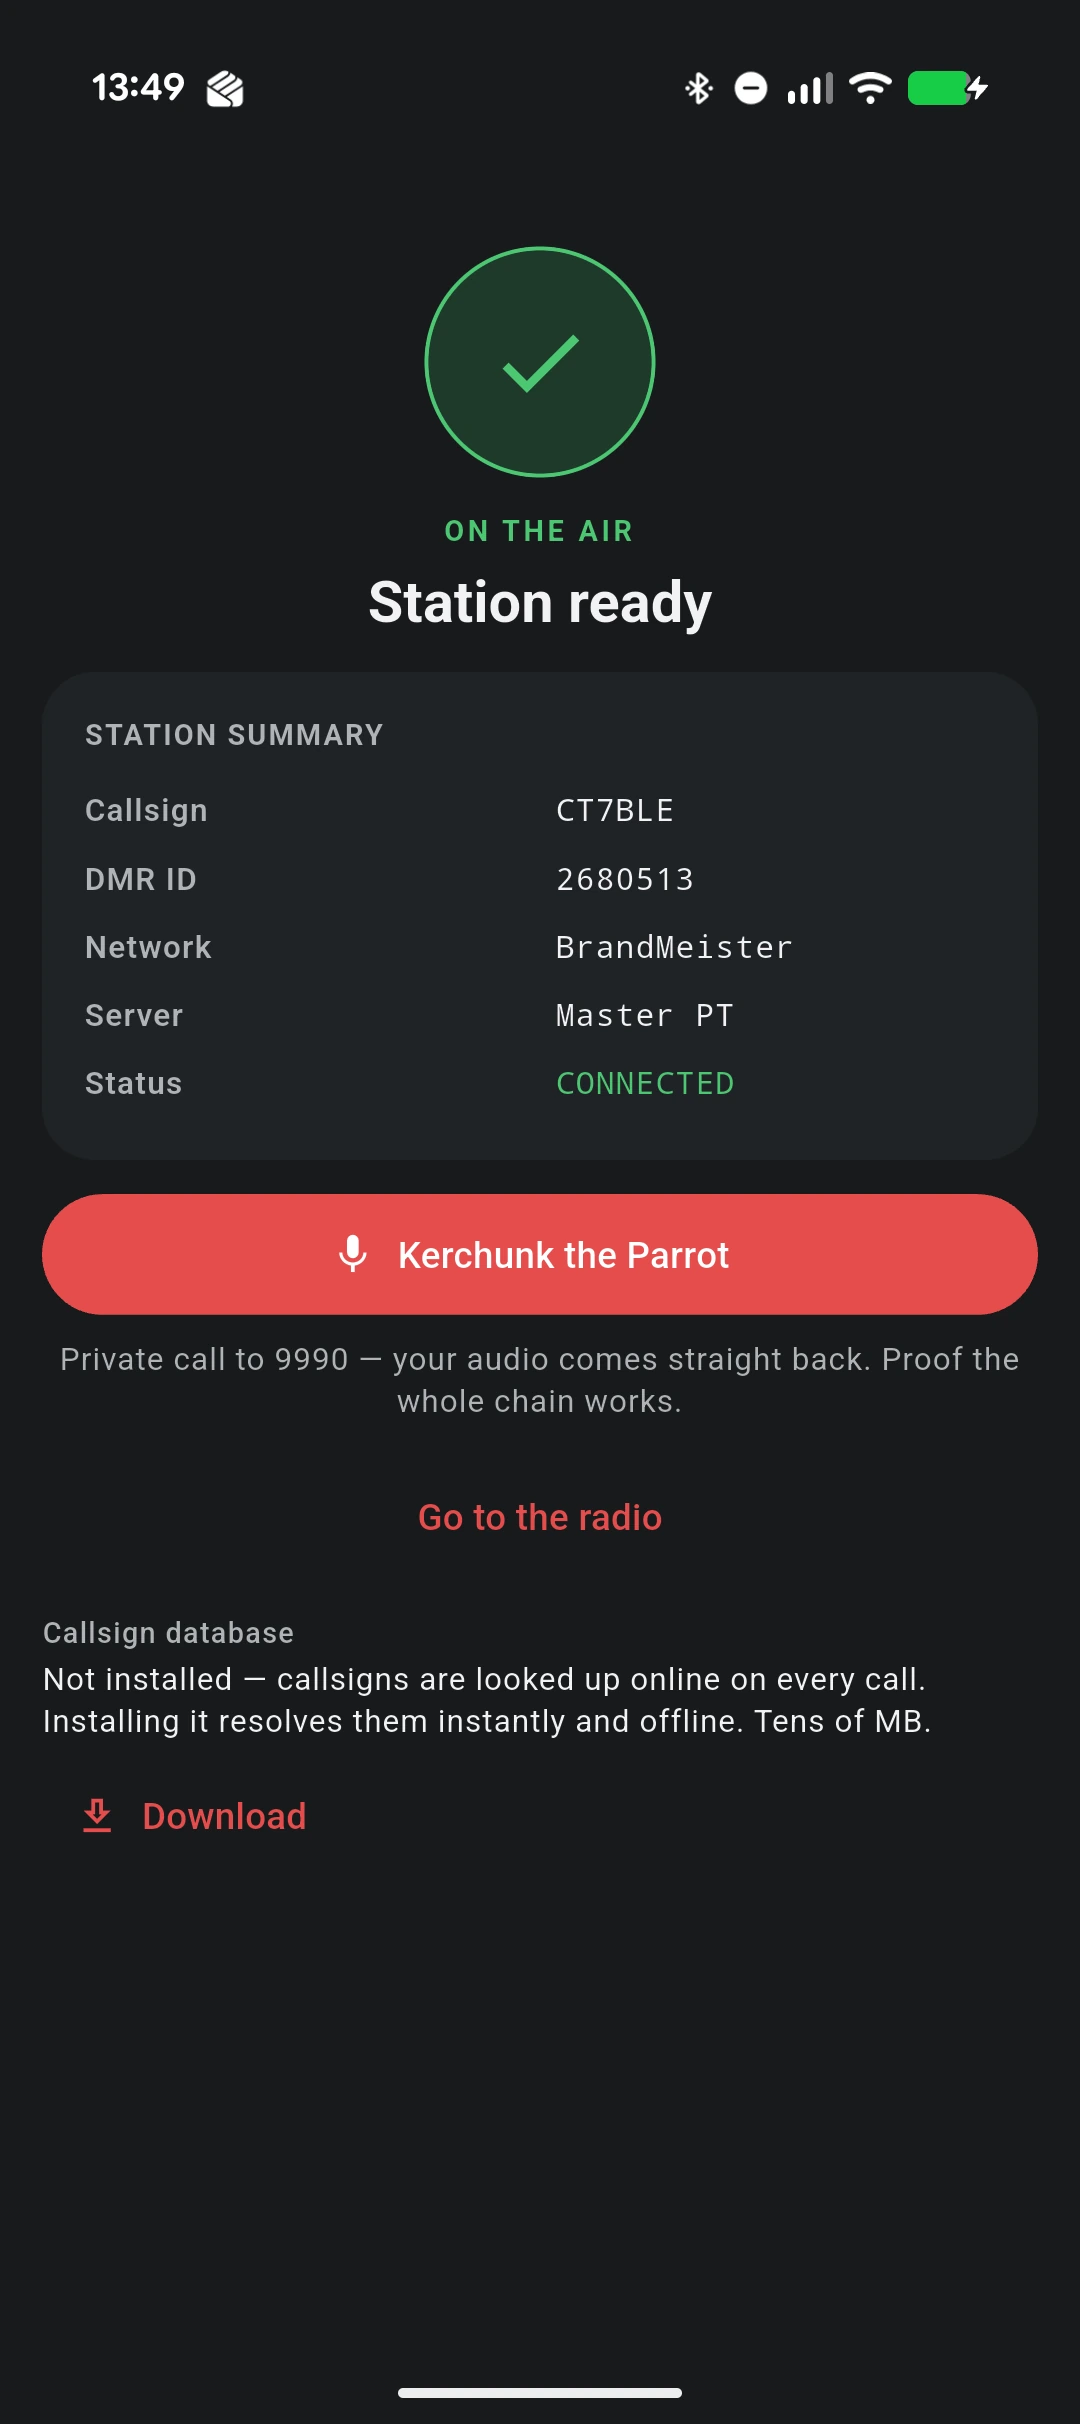
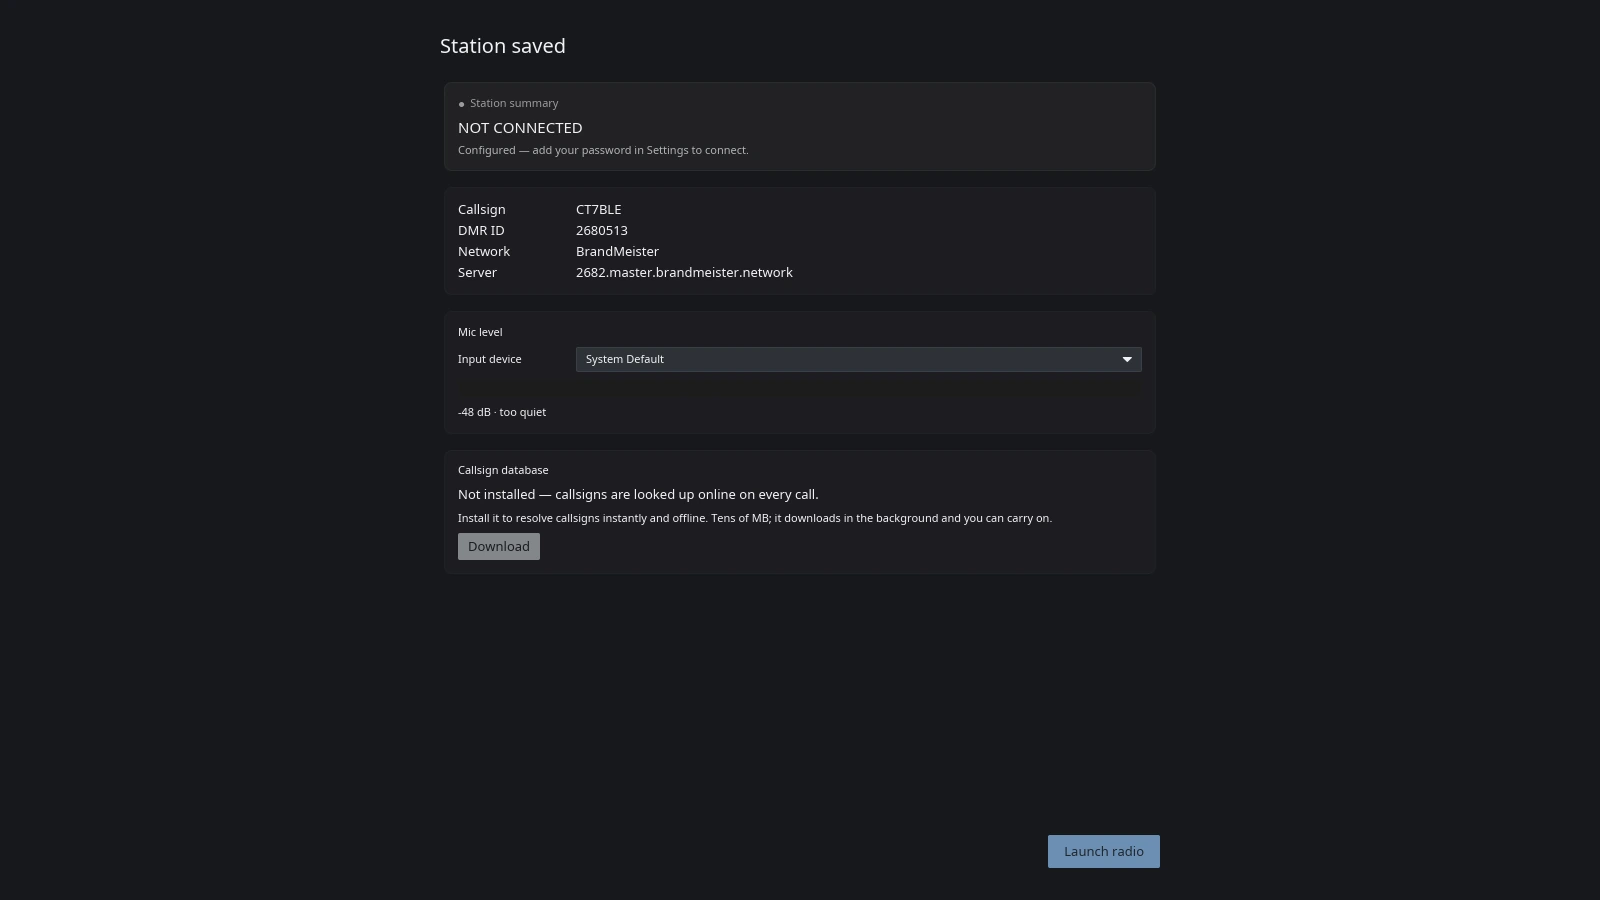
On desktop the heading reads Station ready once it connects and Station saved when it hasn’t, and the mic level and input-device picker sit on this screen rather than on a step of their own.
The last screen summarises what was actually configured — callsign, DMR ID, network, server, and whether the station is connected. It shows measured facts only; there’s no signal-strength reading, because a network client doesn’t have one.
There are three ways it can end, and all of them are a legitimate finish:
| Status | What happened | What to do |
|---|---|---|
| CONNECTED | Profile saved, logged in, idle on your talkgroup. | Press Kerchunk the Parrot and say something. Hearing yourself back proves the whole chain — mic, vocoder, network, and audio out. |
| NOT CONNECTED, “add your password in Settings” | Profile saved. You skipped the password, so no login was attempted rather than one fired off that could only fail. | Add the password in Settings, or use Back to the password step. |
| NOT CONNECTED, with an error | Profile saved, the login was rejected or timed out. | The error names the cause — a rejected login is almost always the password. See Troubleshooting. |
Skip the password and the same screen reports it, with the route back:
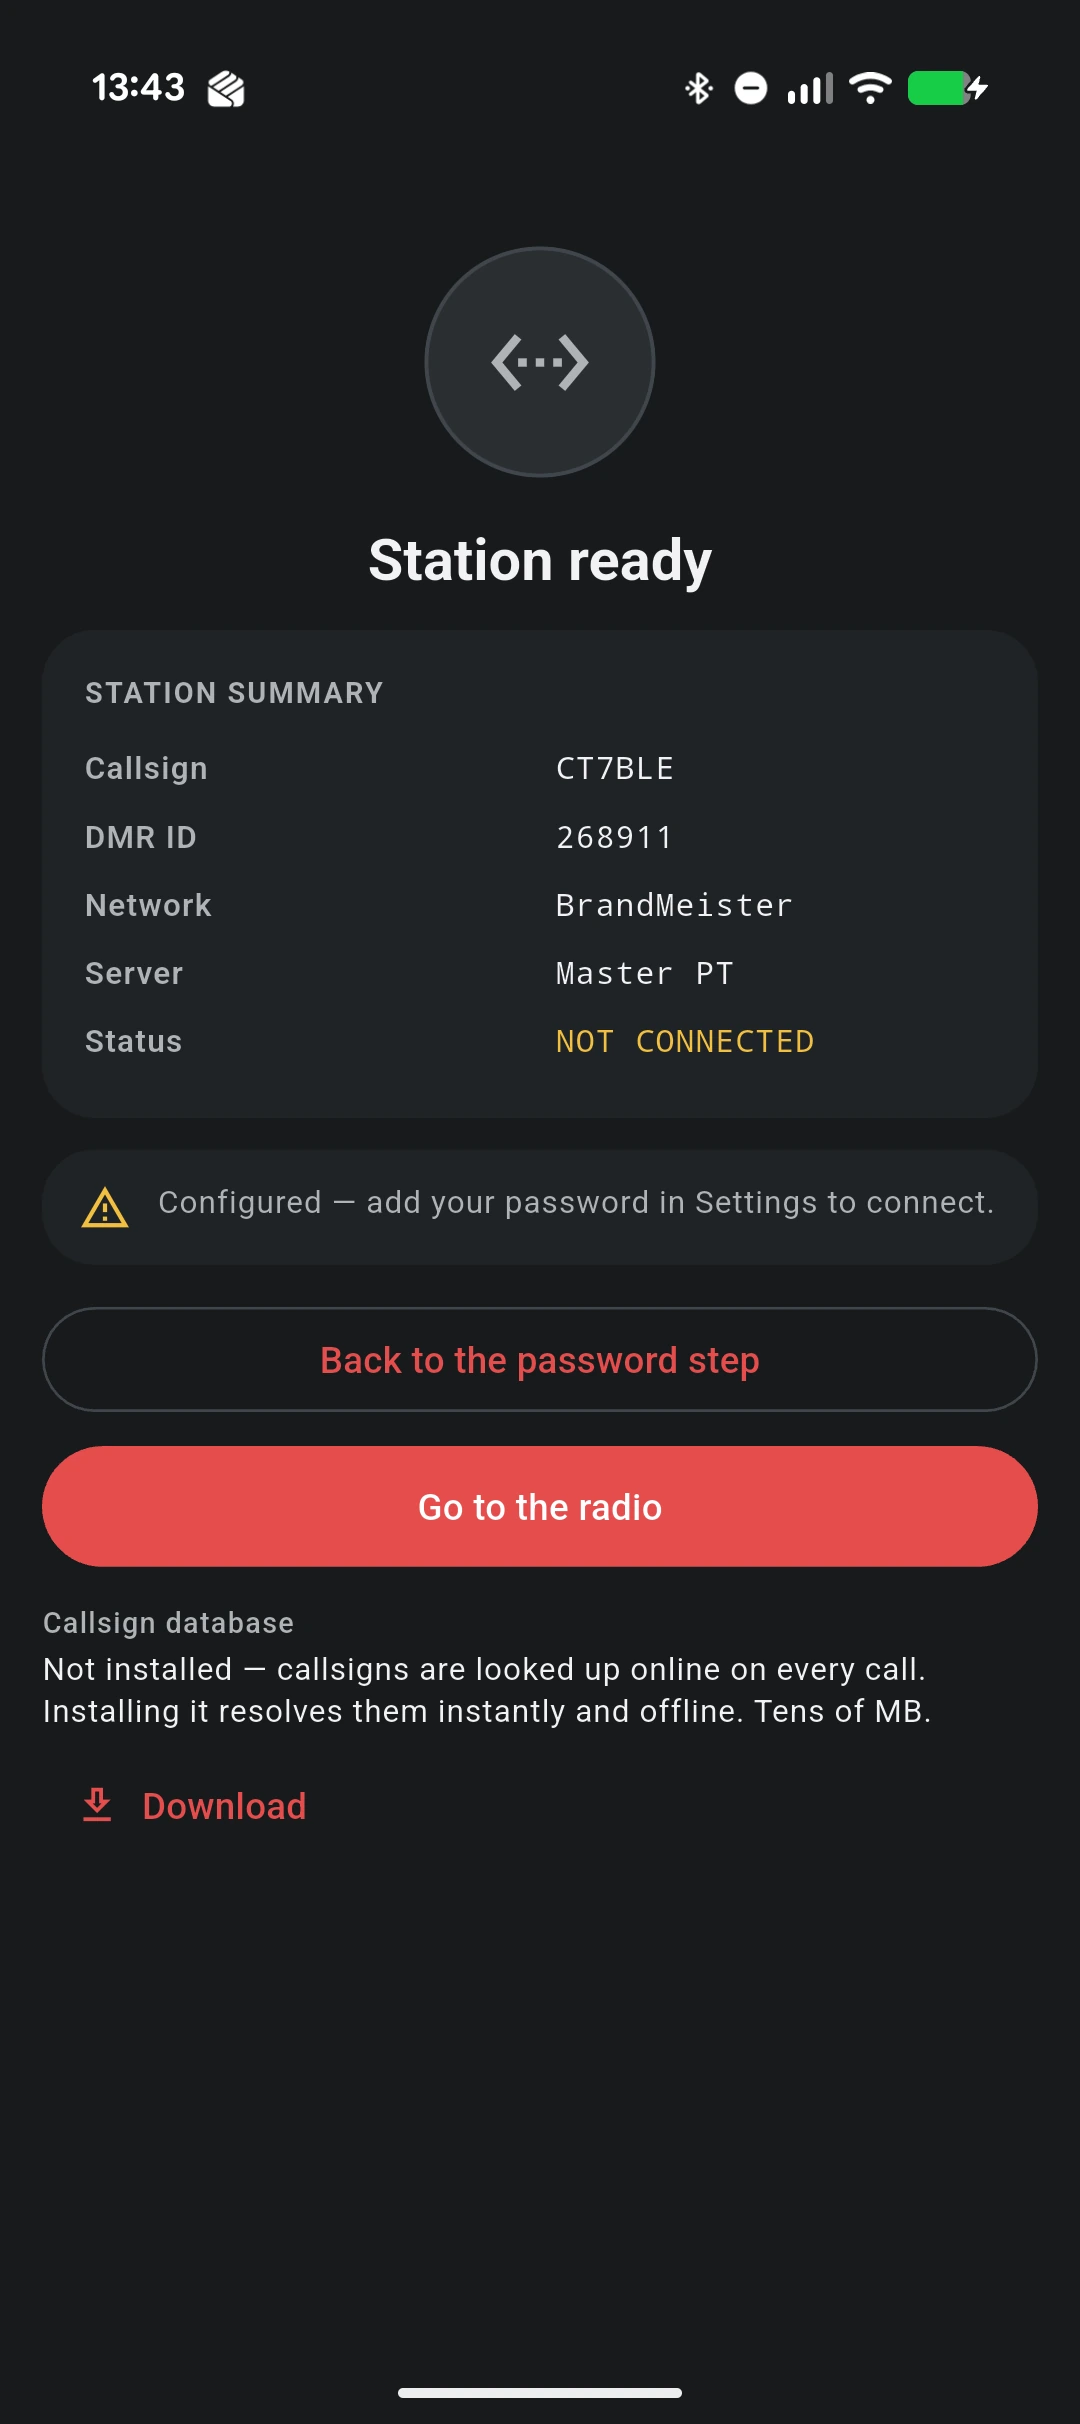
The final screen also offers the callsign database. Without it, callsigns are looked up online on every call; installing it (tens of MB, downloaded in the background) resolves them instantly and offline.
Running it again
Both platforms keep the wizard under Settings → About → Run setup wizard.
A re-run adds a new profile and makes it active — it never edits or overwrites the one you already have, so walking through it again can’t break a setup that works.
The desktop re-run starts prefilled from your active profile.
The Android re-run starts blank.
Next steps
- First Connection — wire up your DMR ID, pick a network, and key up for the first time.
- Server Profiles — keep multiple network configs (BrandMeister, TGIF, FreeDMR…) side by side and switch between them.