Server Profiles
VoxDMR can hold as many network configurations as you need — one per network, per shack, per role, whatever. A profile bundles together:
- A label (your name for it)
- A DMR ID (so different family members or different IDs can share one install)
- A protocol (BrandMeister via Rewind, or any of the MMDVM/Homebrew networks)
- A server (master hostname + port, picked from a network directory or entered by hand)
- A password specific to that network
- A callsign (optional, used by Homebrew networks)
- Its own talkgroup favorites and aliases (see Talkgroups)
Switching profiles disconnects, swaps in the new config, and reconnects.
Why multiple profiles?
A few real cases:
- You’re on BrandMeister and TGIF. Different networks, different passwords, different talkgroup numbers. Keep one profile per network and switch when you want to QSY.
- You run a portable rig and a home rig with different IDs. Each profile has its own DMR ID.
- You’re testing a Homebrew master. A throwaway profile is safer than rewriting your working BrandMeister setup.
- You travel. Keep a regional master per country and switch when you cross a border.
Where they live
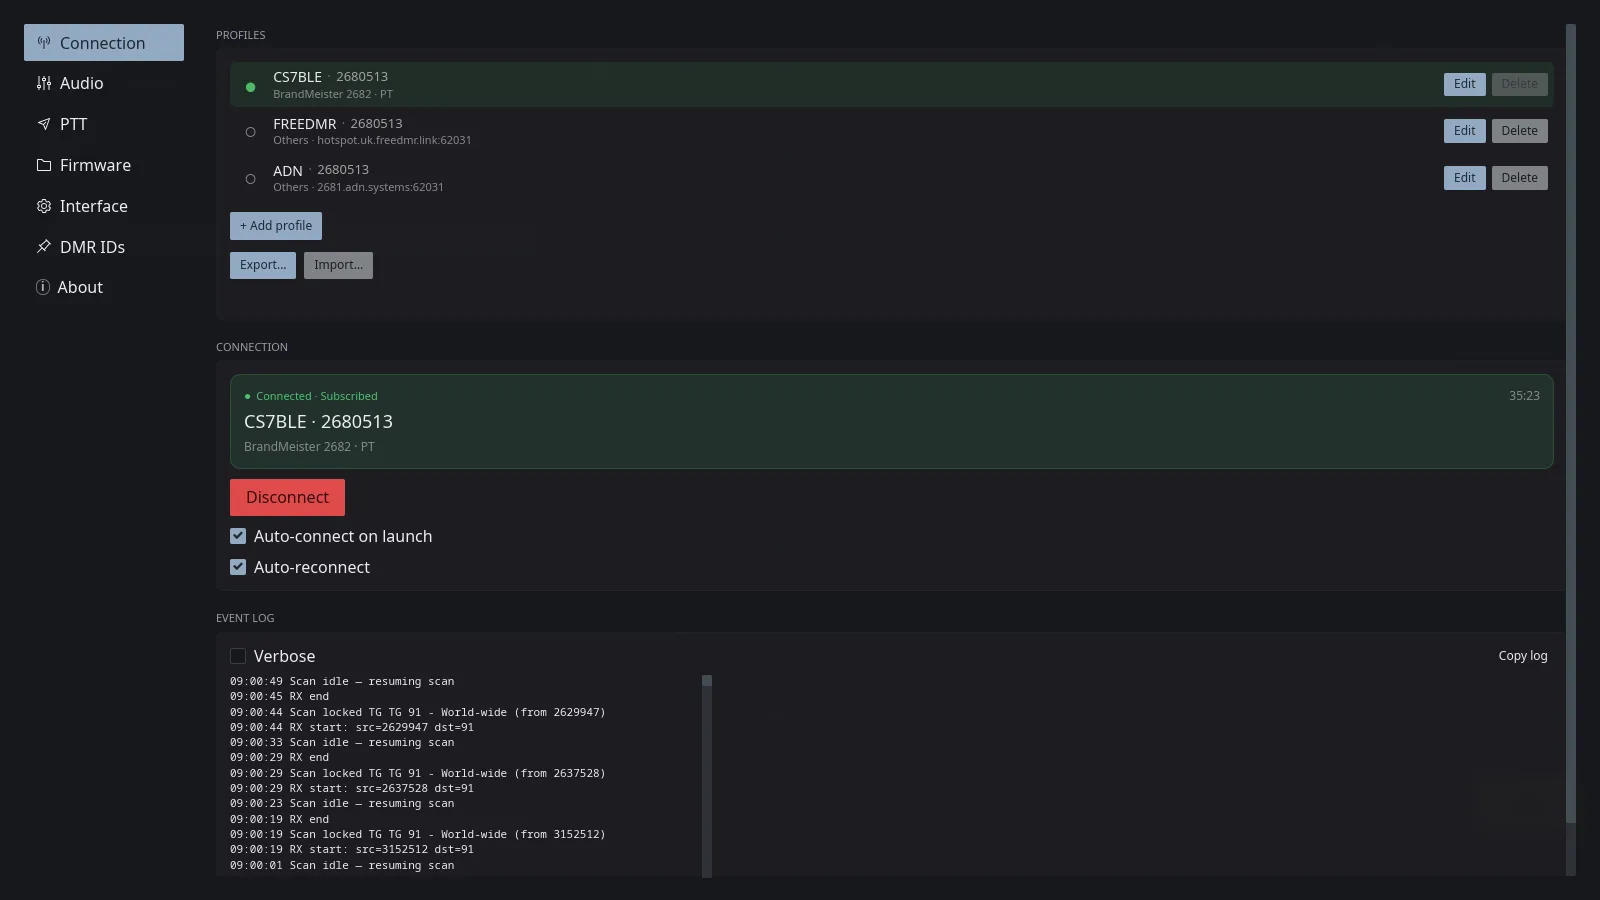
Settings → Connection has a PROFILES card at the top. Each profile shows as one row:
● Home          1234567
BrandMeister · 2682.master.brandmeister.network:54006 Edit Delete- The filled radio (●) marks the active profile.
- Click any hollow radio (○) to switch to that profile.
- Label, DMR ID, protocol, and server line are all visible at a glance.
- Delete is greyed out on the active profile and on the only remaining profile (VoxDMR always needs one).
Adding a profile
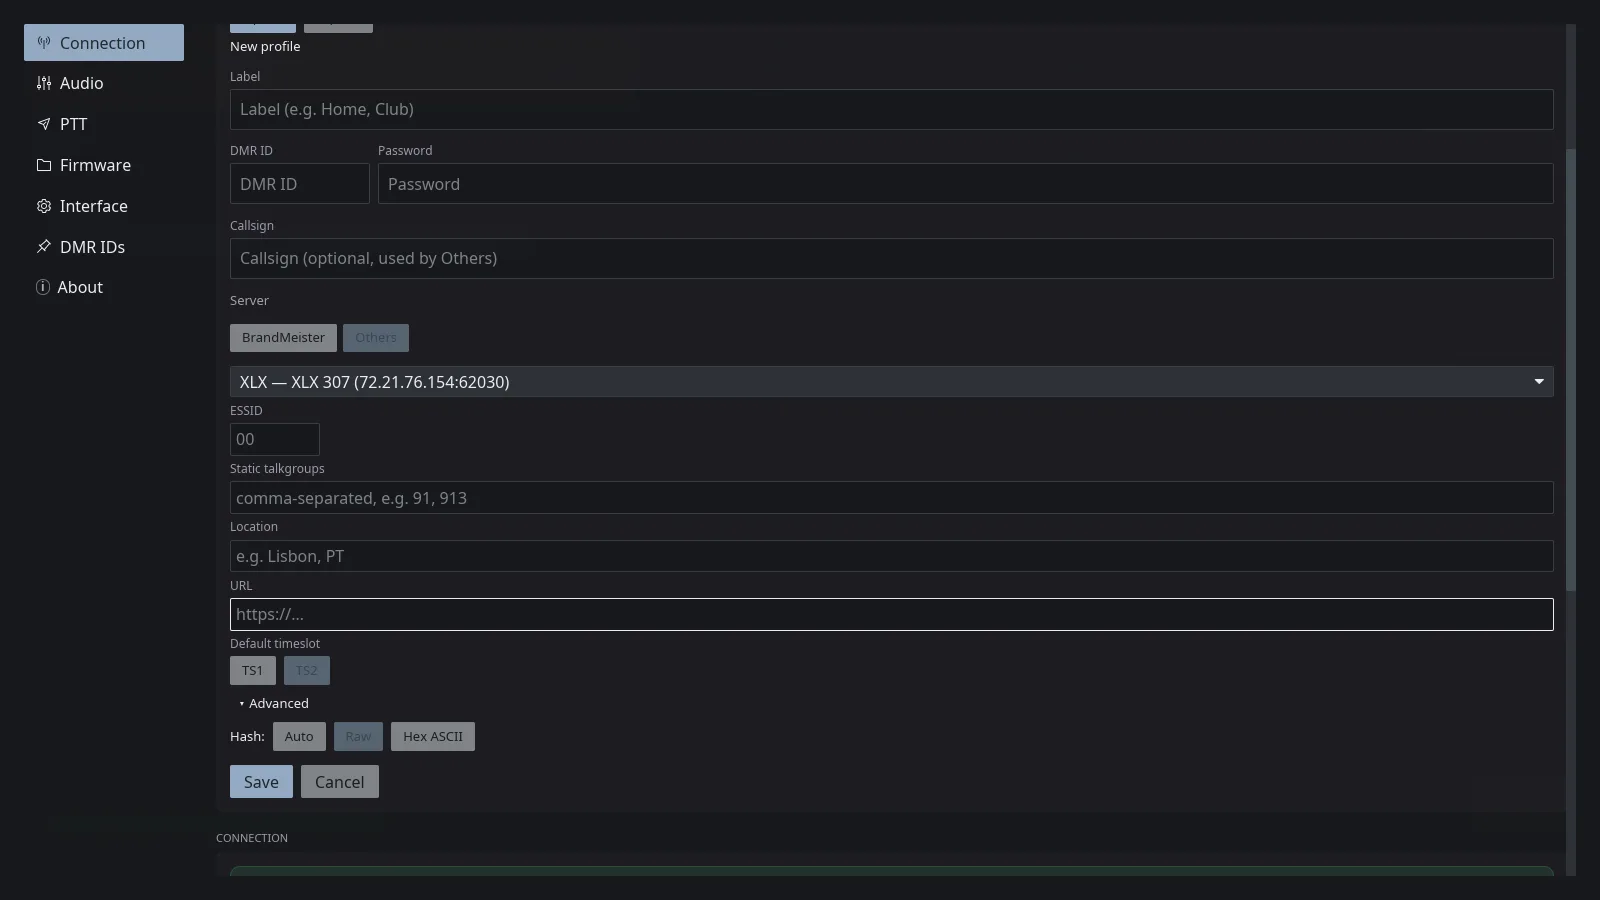
Click + Add profile below the list. An inline form appears with these fields:
- Label — your short name for this profile.
- DMR ID — the ID this profile uses. BrandMeister (Rewind) profiles are capped at 7 digits (max
9999999); Others (Homebrew) profiles accept any length. - Password — the network password for this profile.
- Callsign — optional, used by Homebrew networks.
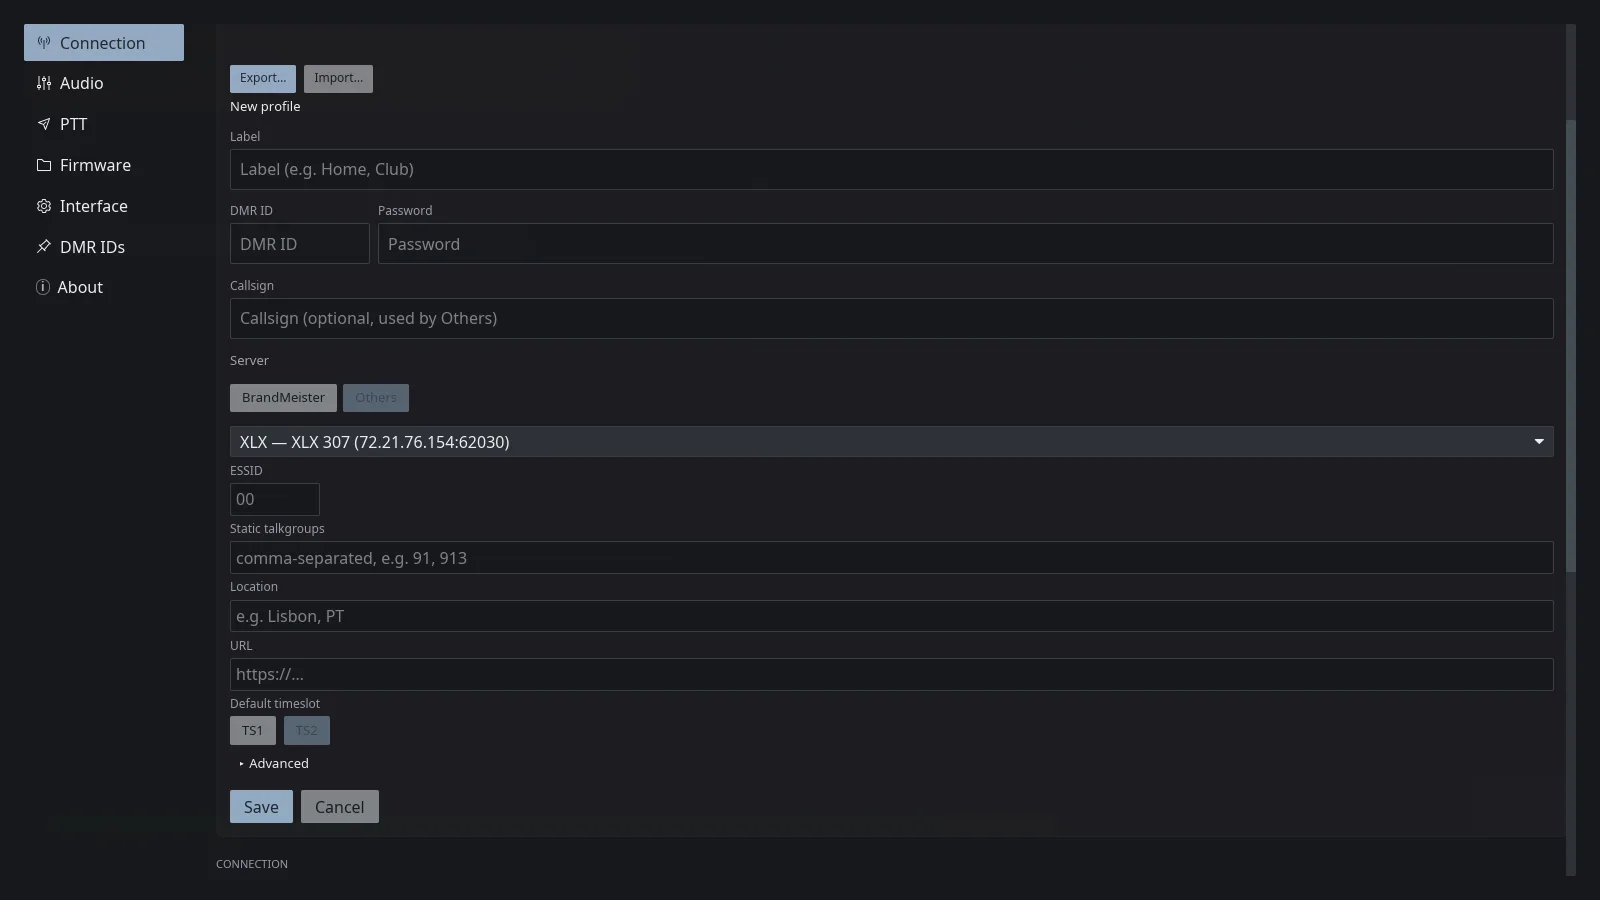
Under the Server heading, two buttons let you pick the protocol:
- BrandMeister — Rewind protocol. The picker below becomes the BrandMeister master directory (fetched live).
- Others — Homebrew protocol. The picker becomes the Homebrew server directory: the community Pi-Star
DMR_Hosts.txtlist (~1,200 masters, grouped by network and searchable). Picking one fills in host, port, and hash format, and prefills the password where the network publishes a shared one. Networks that need you to sign up first are marked Account required. BrandMeister masters are excluded — they belong on a BrandMeister profile. A Custom server… option lets you enter one by hand.
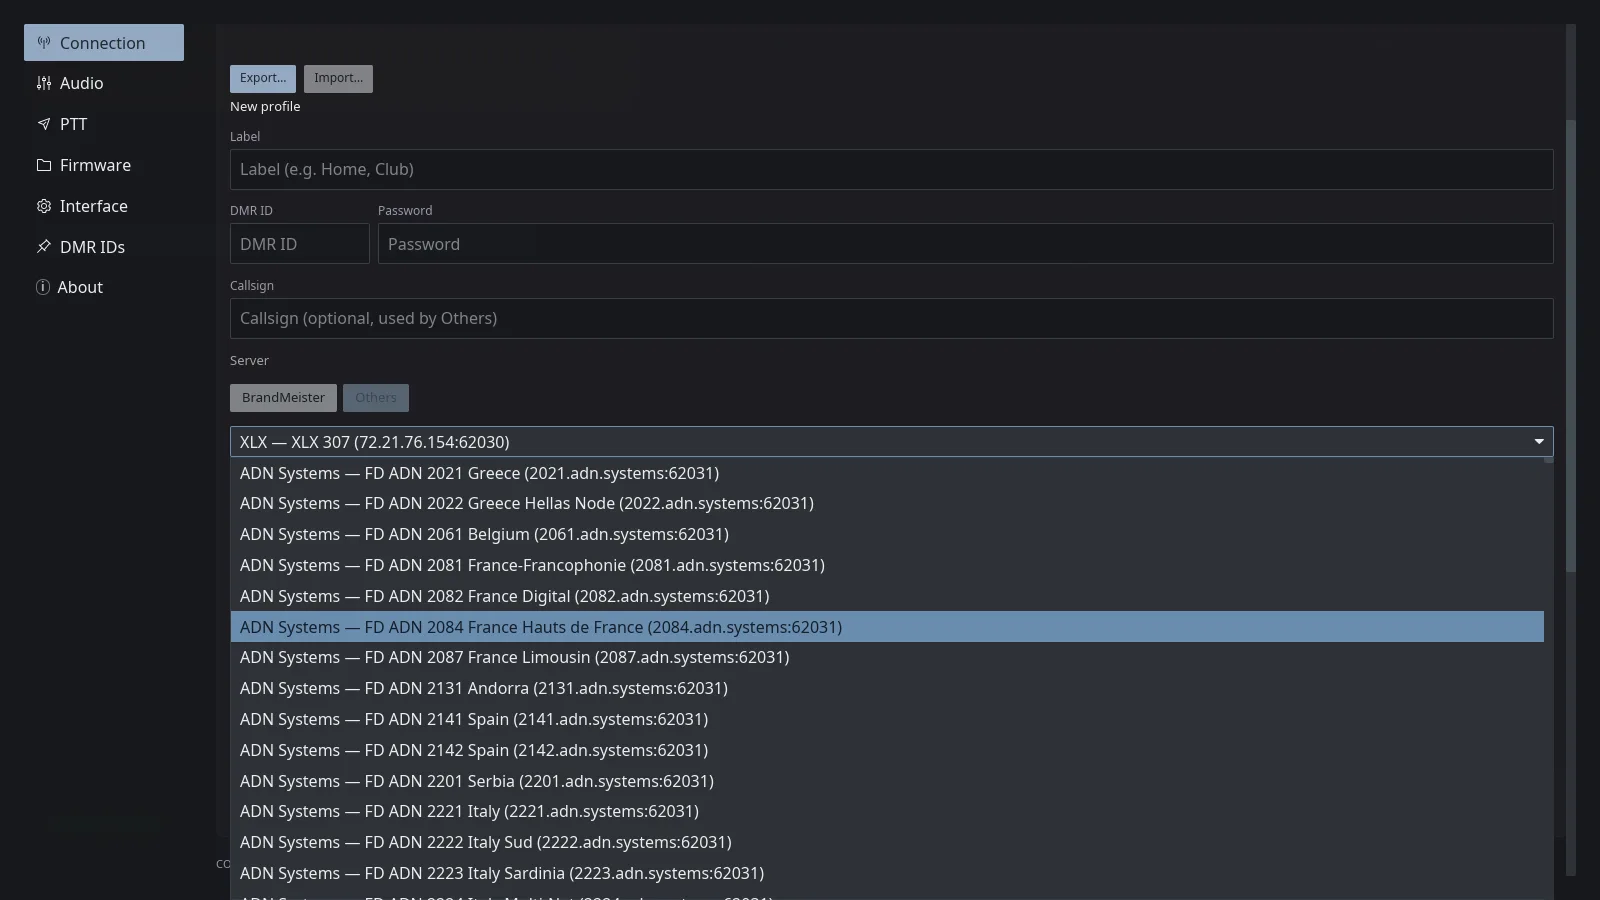
For Custom server…, two extra fields appear:
- Host — the master hostname or IP.
- Port — Homebrew masters typically use
62031.
You can’t point an Others profile at a BrandMeister master — VoxDMR rejects it with BrandMeister masters must use the BrandMeister protocol. Use a BrandMeister profile for those. Homebrew profiles take a few more fields — a default timeslot, static talkgroups, an ESSID, and dashboard identity — with only the login hash format tucked under an Advanced disclosure (see Homebrew profile fields).
Click Save. The new profile appears in the list.
Editing a profile
Click Edit on any row to load that profile into the same form. The Password field shows a placeholder Password (leave blank to keep current) — only fill it in if you want to change it. Everything else is editable.
Switching profiles
Click the radio button on any inactive profile. VoxDMR:
- Disconnects from the current server.
- Loads the new profile (DMR ID, protocol, server, password, callsign, aliases, favorites).
- If Auto-connect is enabled, connects to the new server.
The main window footer updates to reflect the new server.
Deleting a profile
Click Delete on any row. There’s no confirmation — the row disappears. Delete is disabled on the active profile (switch first) and on the only remaining profile.
Where they live
Tap the Connection tab in the bottom navigation. The Identity card at the top shows the active profile — or Not configured if you’re starting fresh — and below it a Switch identity list of your other profiles. Tap any one to swap to it without leaving the screen.
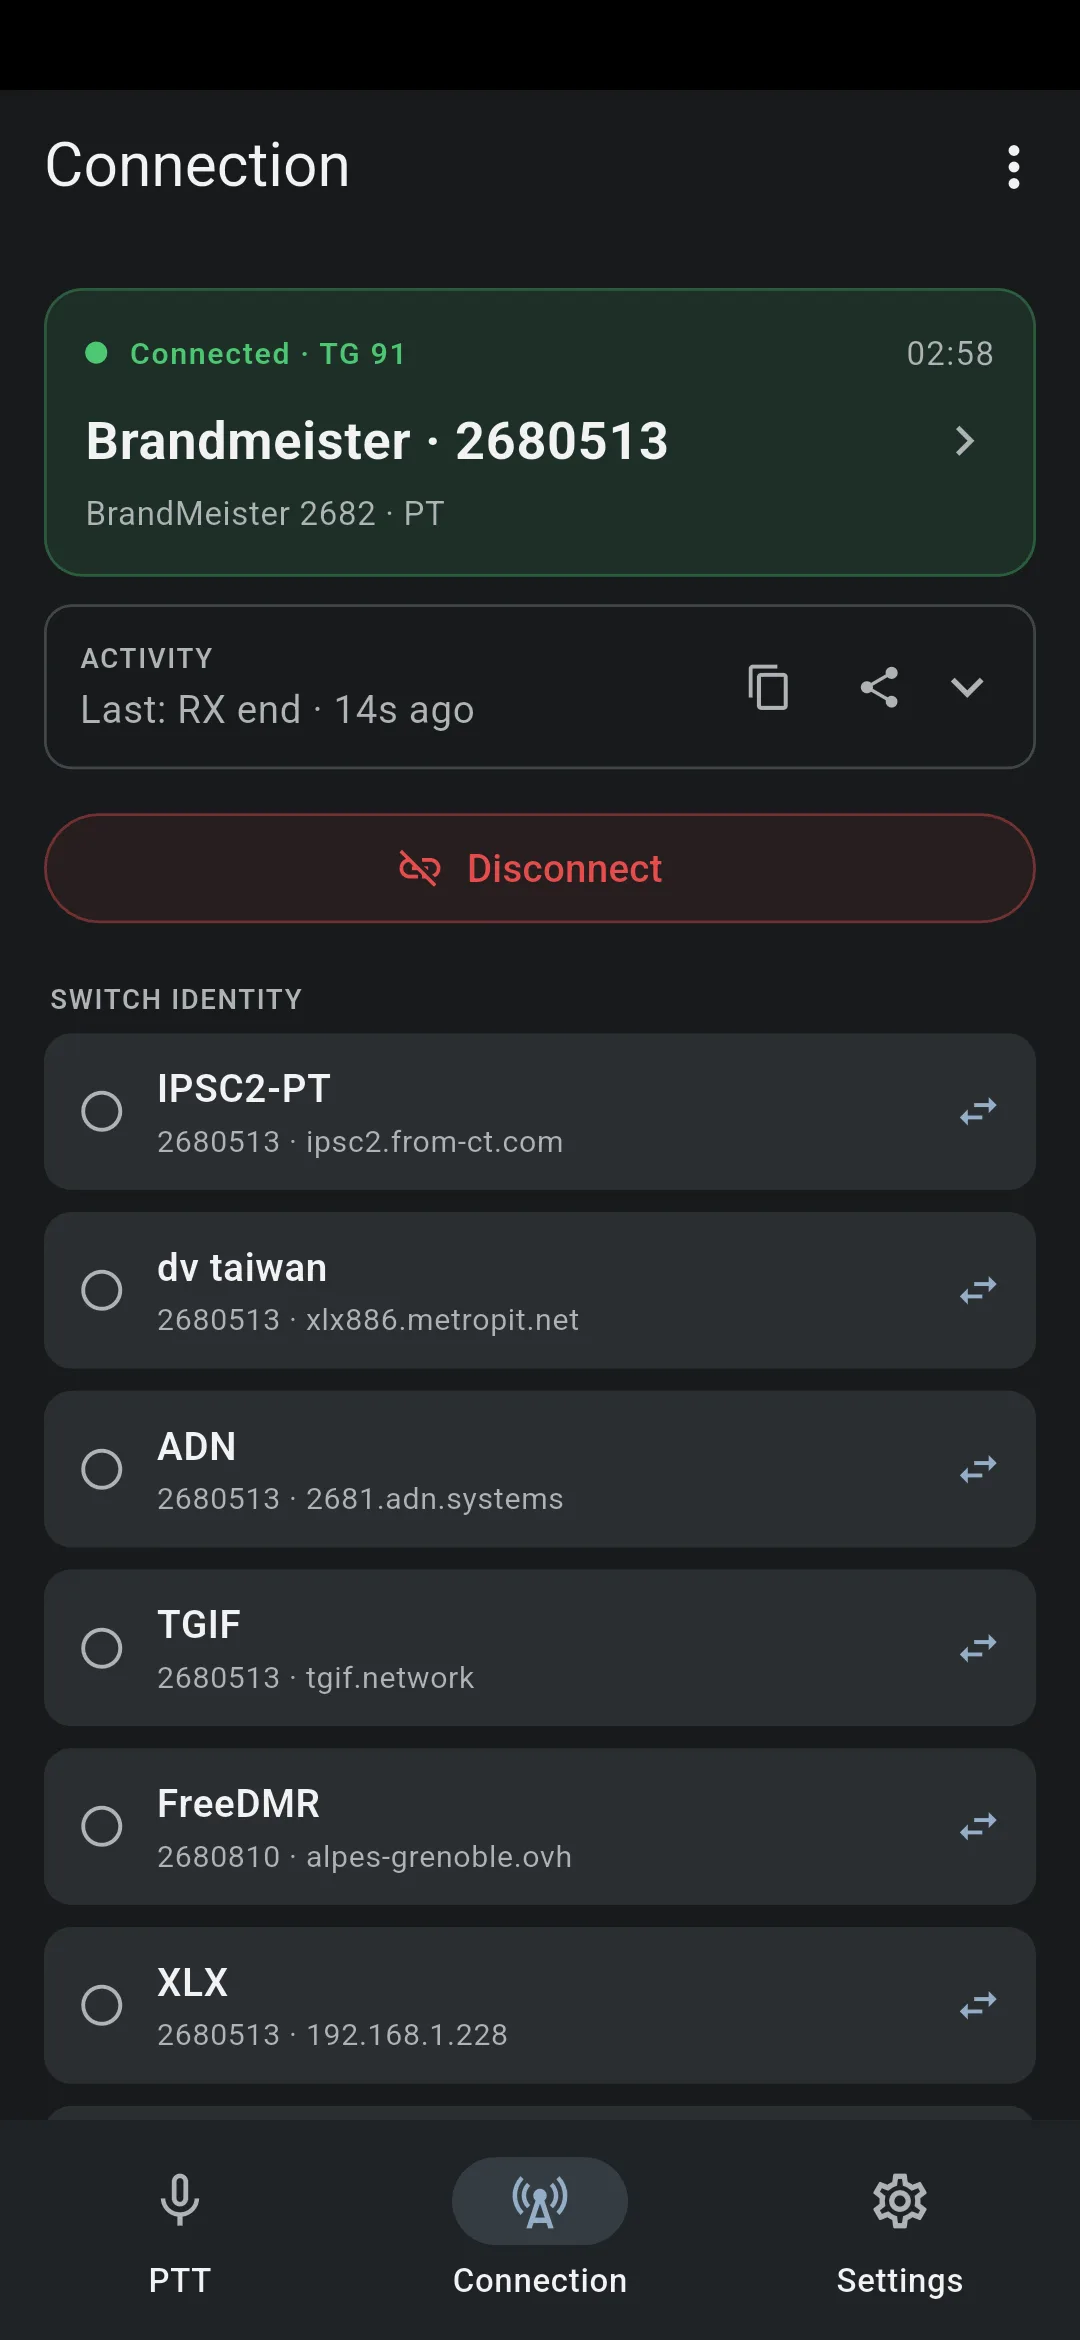
For the full list — adding, editing, or deleting — tap the Identity card to open the Profiles screen, where each profile is a row with a radio button, label, DMR ID, and overflow menu (⋮).
Adding a profile
Tap + Add profile at the bottom of the Profiles screen. The form opens as a full-screen modal with the same fields as desktop: Label, DMR ID, Password, Callsign, and a Server section with the BrandMeister / Others segmented button.
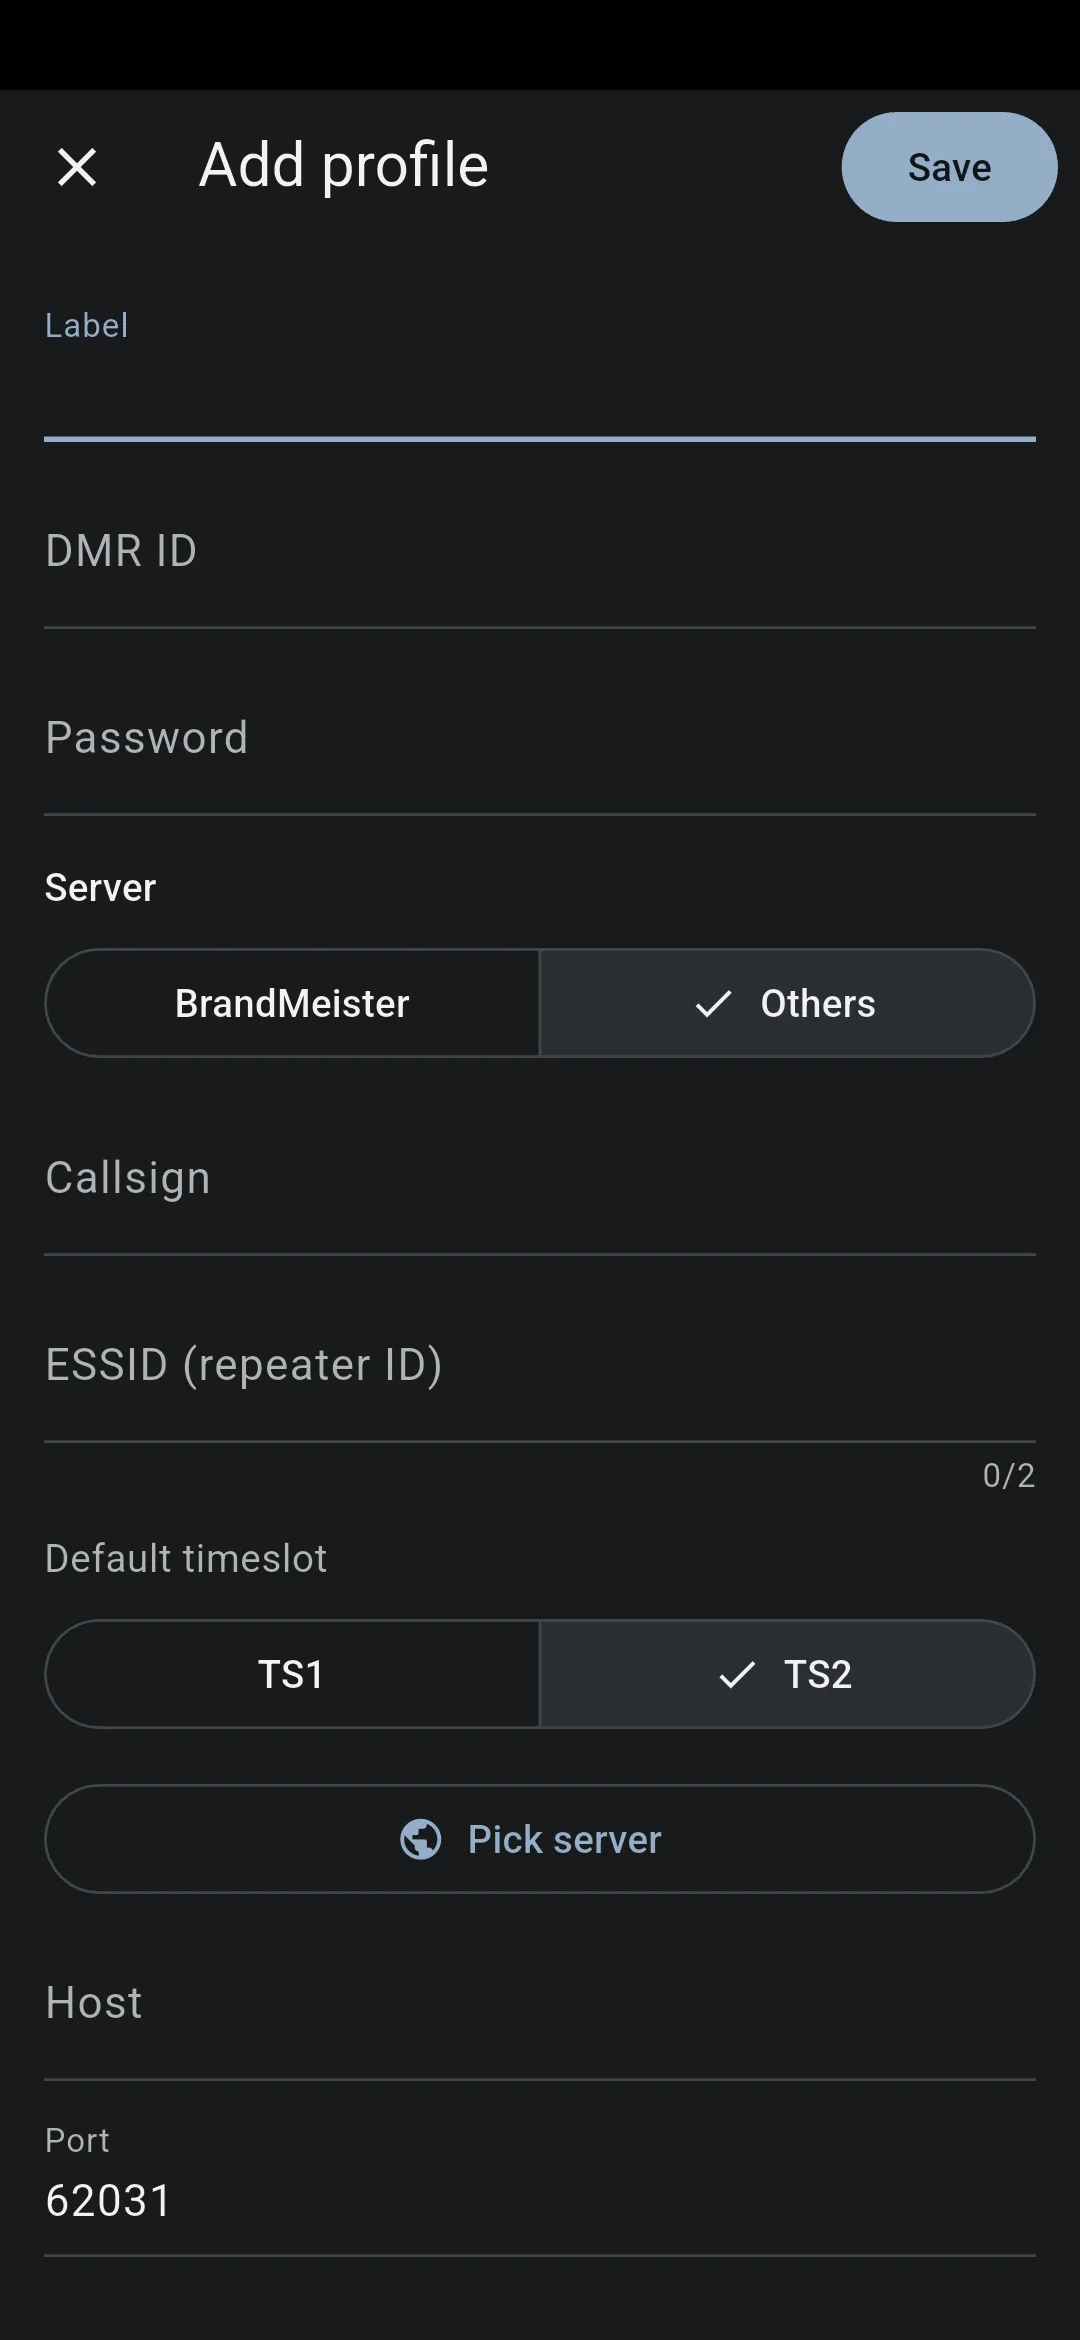
BrandMeister: tap the server row to open the BrandMeister servers bottom sheet. Search by country or hostname; tap a master to select it.
Others: tap the Pick server button to open the Servers bottom sheet — the searchable Pi-Star DMR_Hosts.txt directory (~1,200 masters, grouped by network). Tap one to fill in host + port + hash format, with the password prefilled where the network publishes a shared one; networks that need an account first are marked Account required. BrandMeister masters are excluded. You can still edit the fields manually below, or enter a custom server by hand.
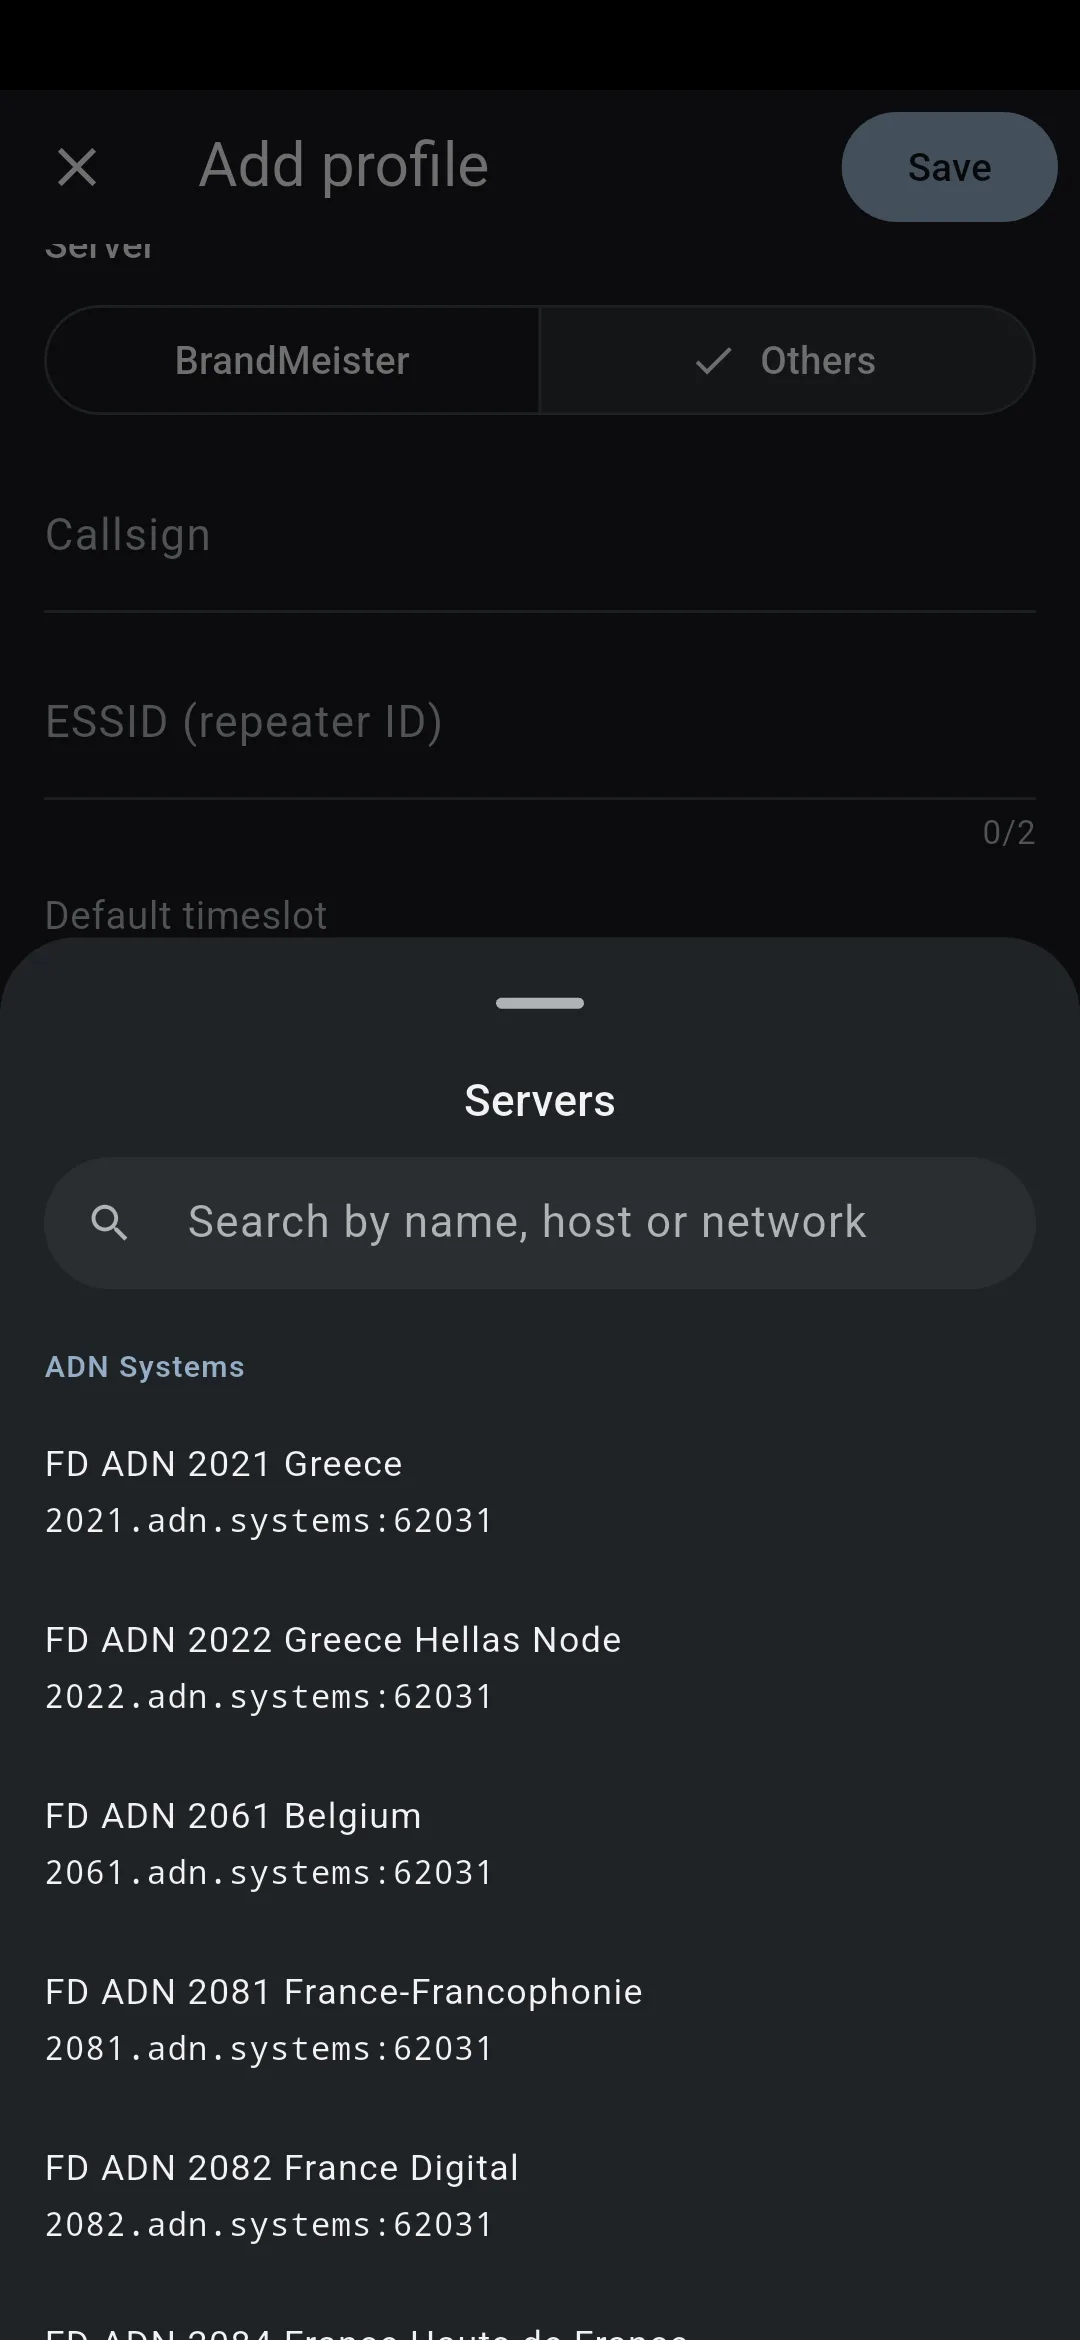
You can’t point an Others profile at a BrandMeister master — VoxDMR rejects it with BrandMeister masters must use the BrandMeister protocol. Homebrew profiles take a few more fields — a default timeslot, static talkgroups, an ESSID, and dashboard identity — with only the login hash format tucked under an Advanced options disclosure (see Homebrew profile fields).
Tap Save.
Switching profiles
Tap the radio button on any inactive profile. If you’re connected, you’ll see a snackbar — Switching to {label}… reconnecting. VoxDMR tears down the old connection and starts the new one.
Deleting a profile
Tap the overflow menu (⋮) on a row and choose Delete profile. A confirmation dialog appears. The only remaining profile can’t be deleted.
Homebrew profile fields
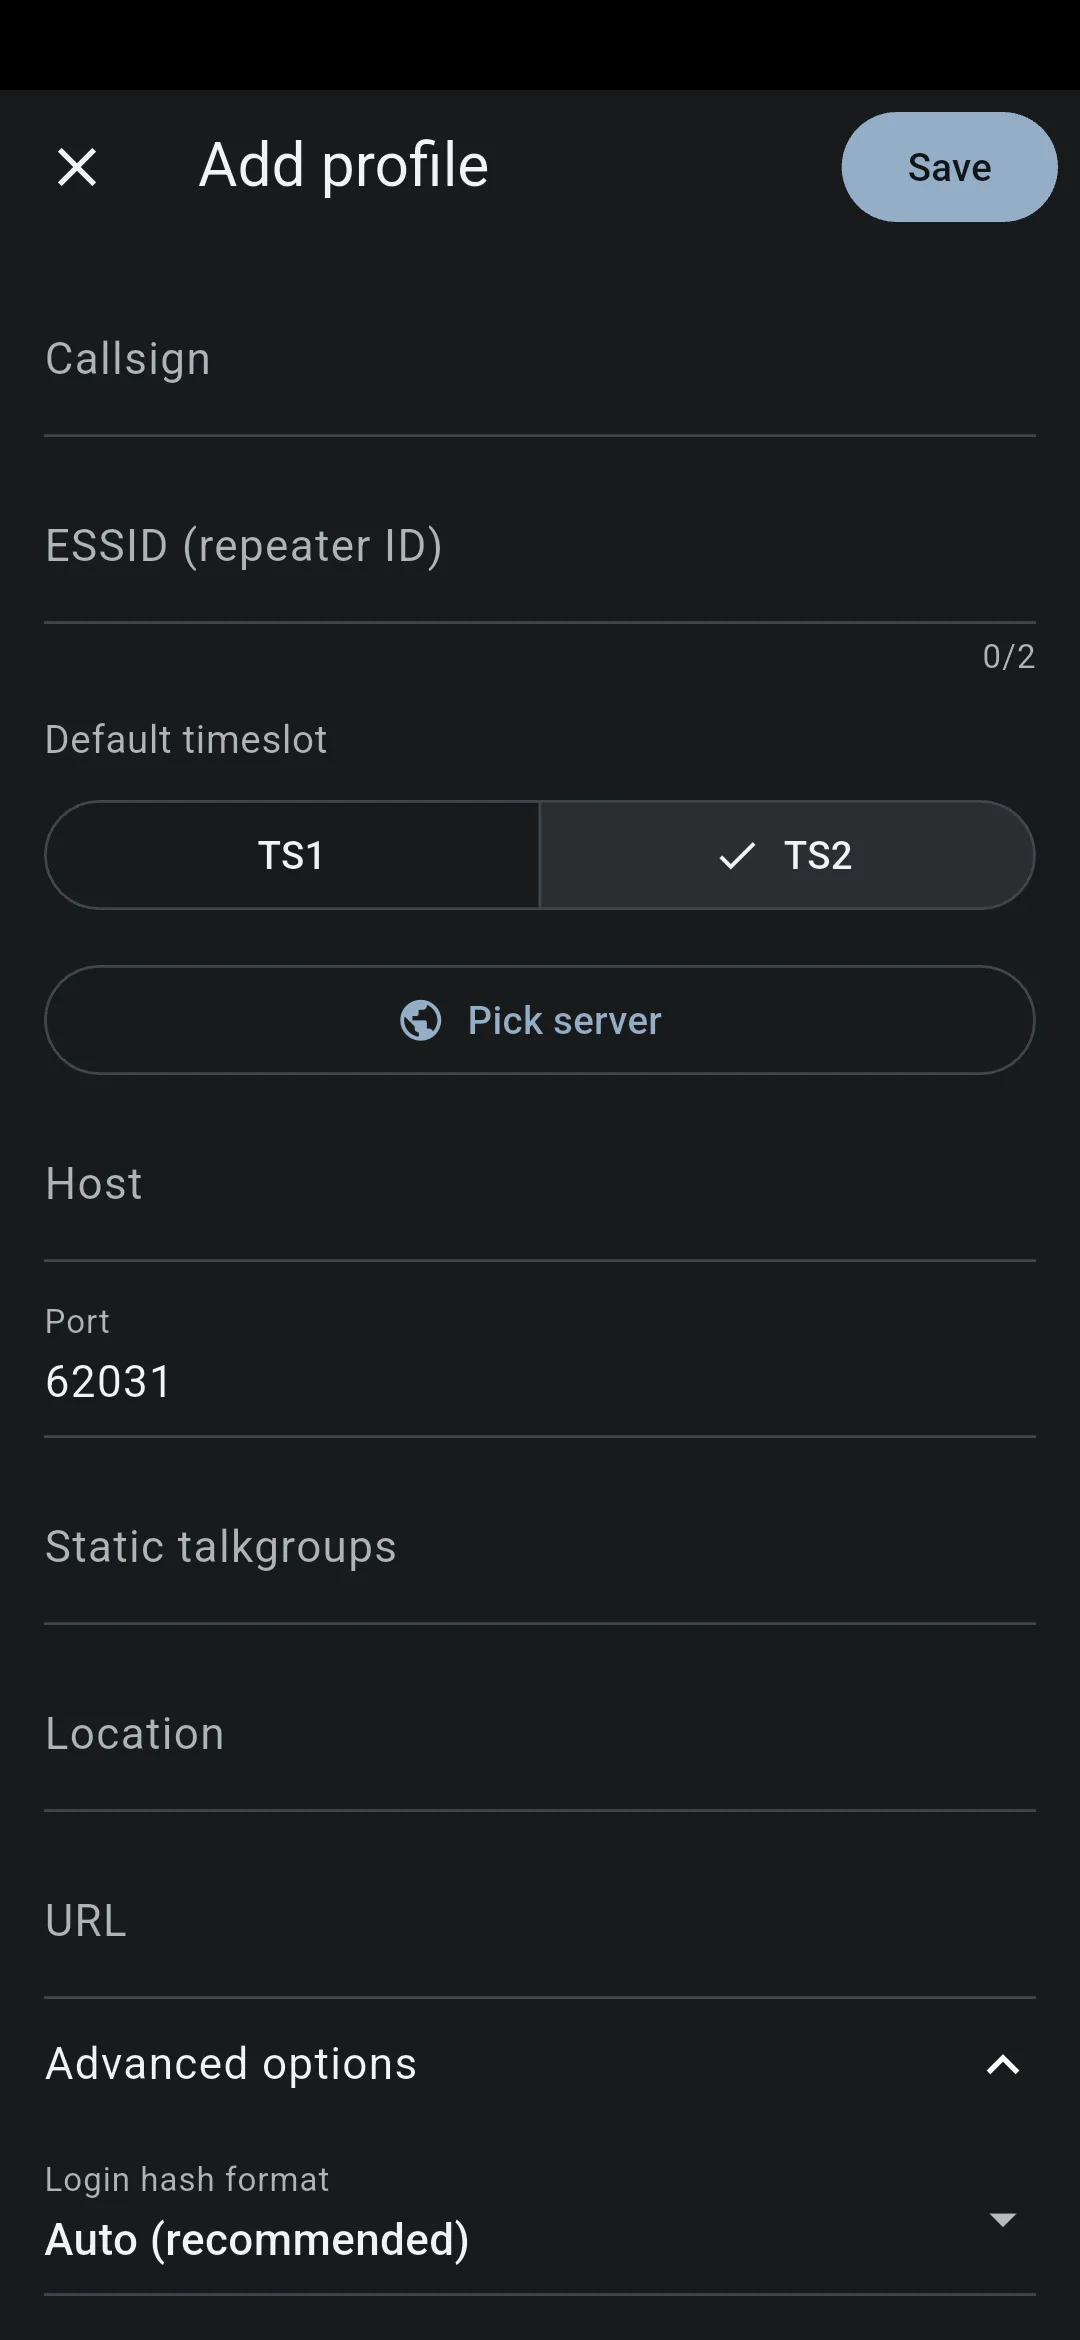
When you pick Others, the profile form grows a handful of extra fields for Homebrew/MMDVM networks. They apply only to Others profiles — BrandMeister profiles ignore them — and the defaults suit most networks. All but the hash format show directly in the form:
- Default timeslot — TS1 or TS2 (default TS2). VoxDMR presents as a simplex/DMO hotspot, so masters are effectively TS2-only; leave it at TS2 unless a network says otherwise.
- Static talkgroups — comma-separated (e.g.
91, 913), registered at connect. VoxDMR now also plays them scanner-style, and keying PTT during a static’s hang routes your reply there. (TGIF doesn’t support server-side statics.) - ESSID (repeater ID) — optional two-digit (0–99). Peer ID becomes DMR ID × 100 + ESSID, so you can run several hotspots on one DMR ID. Blank = bare DMR ID.
- Location and URL — the identity shown on the master’s dashboard. Your callsign is always sent.
Only the login hash format sits behind a disclosure:
Expand Advanced at the bottom of the profile form for the Login hash format — Auto (recommended), Raw, or Hex-ASCII. Auto tries Raw, then retries Hex-ASCII on a login rejection, so you rarely touch it.
Tap Advanced options at the bottom of the form for the Login hash format — Auto (recommended), Raw, or Hex-ASCII. Auto tries Raw, then retries Hex-ASCII on a login rejection, so you rarely touch it.
How profiles are stored
Profiles live in config.toml in the config directory (paths). Each profile is a [[profiles]] table with all its fields. Aliases are nested per profile as a talkgroup_aliases map. The active profile is recorded by index.
You can edit the file by hand for bulk changes (rare; the in-app editor covers everything), but please close VoxDMR first so the changes aren’t overwritten on save.
Latitude and longitude for the Homebrew dashboard are config.toml-only — there’s no UI for them.
Profiles live in the app’s private data directory. They’re managed entirely through the in-app UI; there’s no direct file editing path on Android.
Switching while transmitting
If you press the radio on a different profile while you’re keyed up, VoxDMR finishes the current transmission first, then tears down the connection and switches. You won’t accidentally key the wrong network.
Next steps
- Talkgroups — favorites, the activity indicator, and per-profile aliases.
- Troubleshooting — what to check when a profile won’t connect.